Mastering Camel Drawing: Your Ultimate Guide To Desert Art
Embark on a delightful artistic journey as we delve into the captivating world of camel drawing. Whether you're a budding artist or simply looking for a fun, creative outlet, learning how to draw a camel can be incredibly rewarding. This comprehensive guide will break down the process into easy-to-follow steps, transforming what might seem like a daunting task into an enjoyable and accessible experience for everyone.
From understanding the unique anatomy of these desert dwellers to choosing the right art supplies and adding intricate details, we'll cover everything you need to create a beautiful camel drawing you'll be proud of. Get ready to unleash your inner artist and bring these magnificent creatures to life on paper, step by step.
Table of Contents
- Why Draw a Camel? Unveiling the Desert's Charms
- Understanding Camel Anatomy for Your Drawing
- Essential Art Supplies for Your Camel Drawing Adventure
- The Foundational Steps: Starting Your Camel Drawing
- Adding the Iconic Humps and Distinctive Features
- Bringing Your Camel to Life: Shading and Coloring Techniques
- Cartoon Camel Drawing: A Simplified Approach for Fun
- Beyond the Basics: Enhancing Your Camel Drawings
- Conclusion: Your Artistic Journey Continues
Why Draw a Camel? Unveiling the Desert's Charms
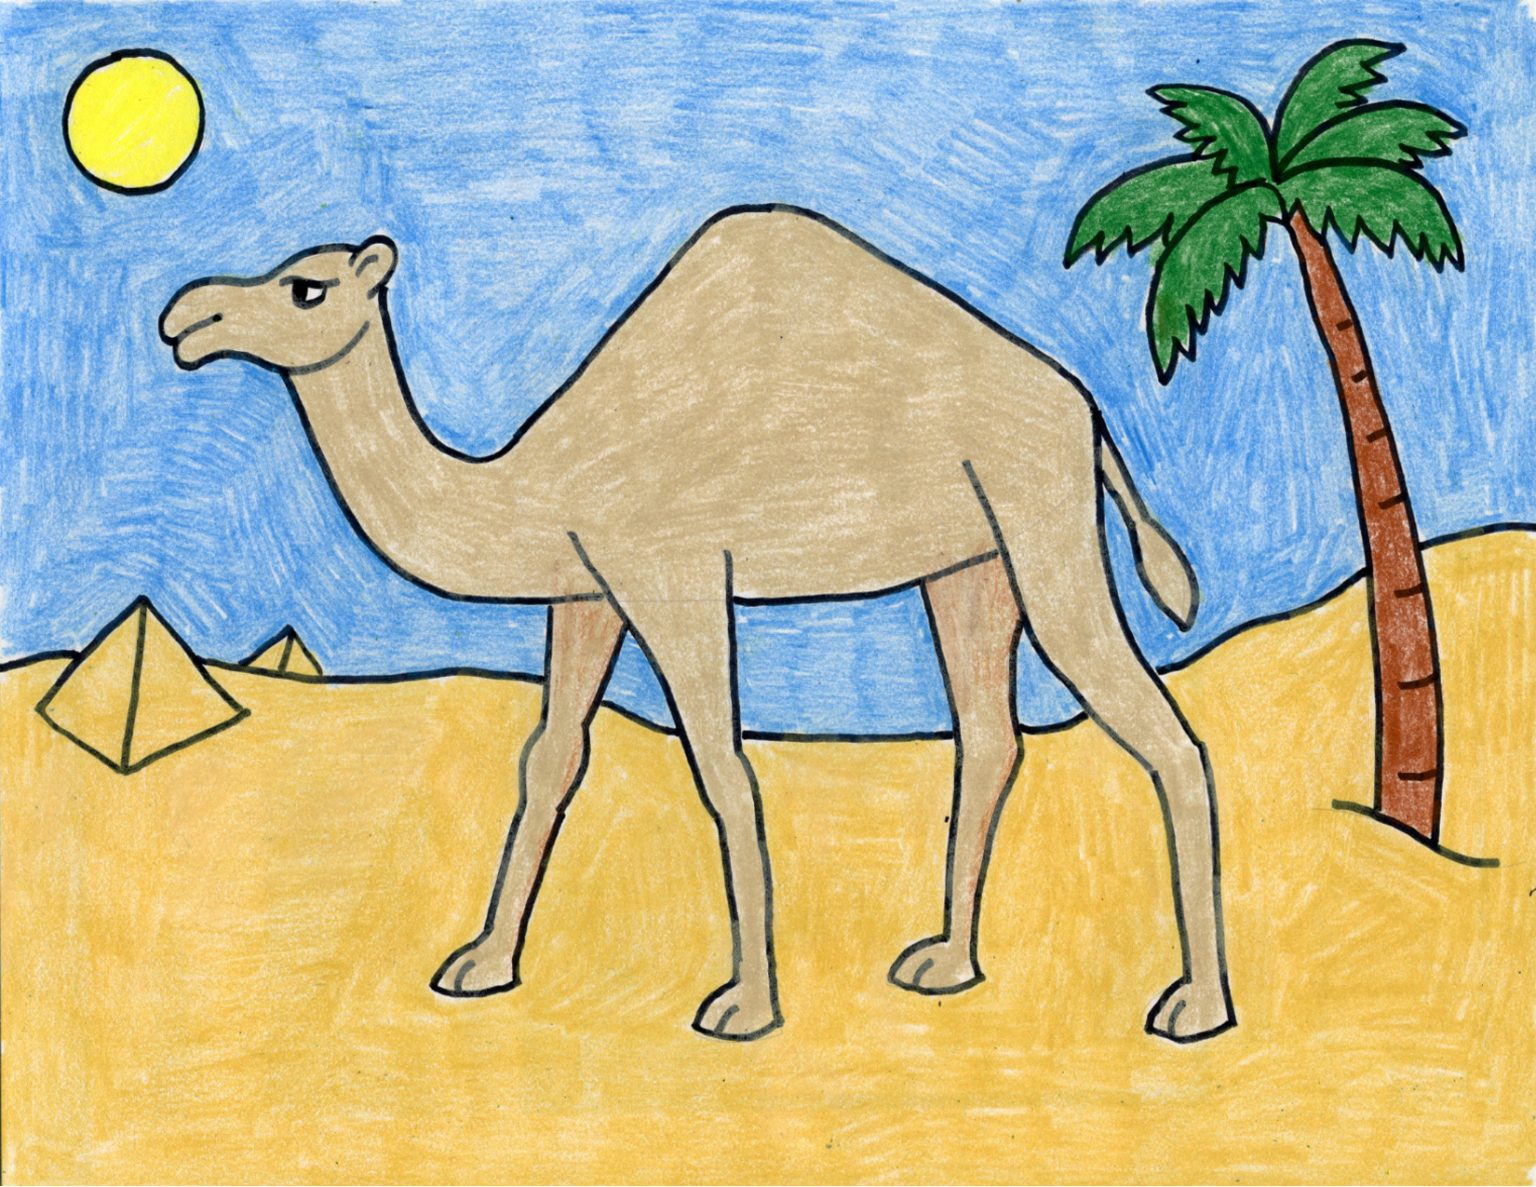
The camel, a large mammal famous for its characteristic humps and its ability to survive in the desert, holds a unique place in the animal kingdom. For centuries, these resilient creatures have been indispensable to human life in arid regions, serving as reliable transport, sources of milk, meat, and wool. Their peculiar appearance, from their long, curved necks to their distinctive humps and surprisingly expressive faces, makes them a fascinating subject for any artist. Drawing a camel isn't just about replicating an image; it's about understanding and appreciating an animal that has adapted remarkably to some of the planet's harshest environments. For children, the camel is a peculiar animal with its extremely peculiar hump and silly head, sparking curiosity and imagination. For adults, the challenge of capturing its unique form offers a rewarding artistic exercise. Whether you aim for realism or a whimsical cartoon camel, the process of camel drawing provides an engaging way to connect with nature and history.Understanding Camel Anatomy for Your Drawing
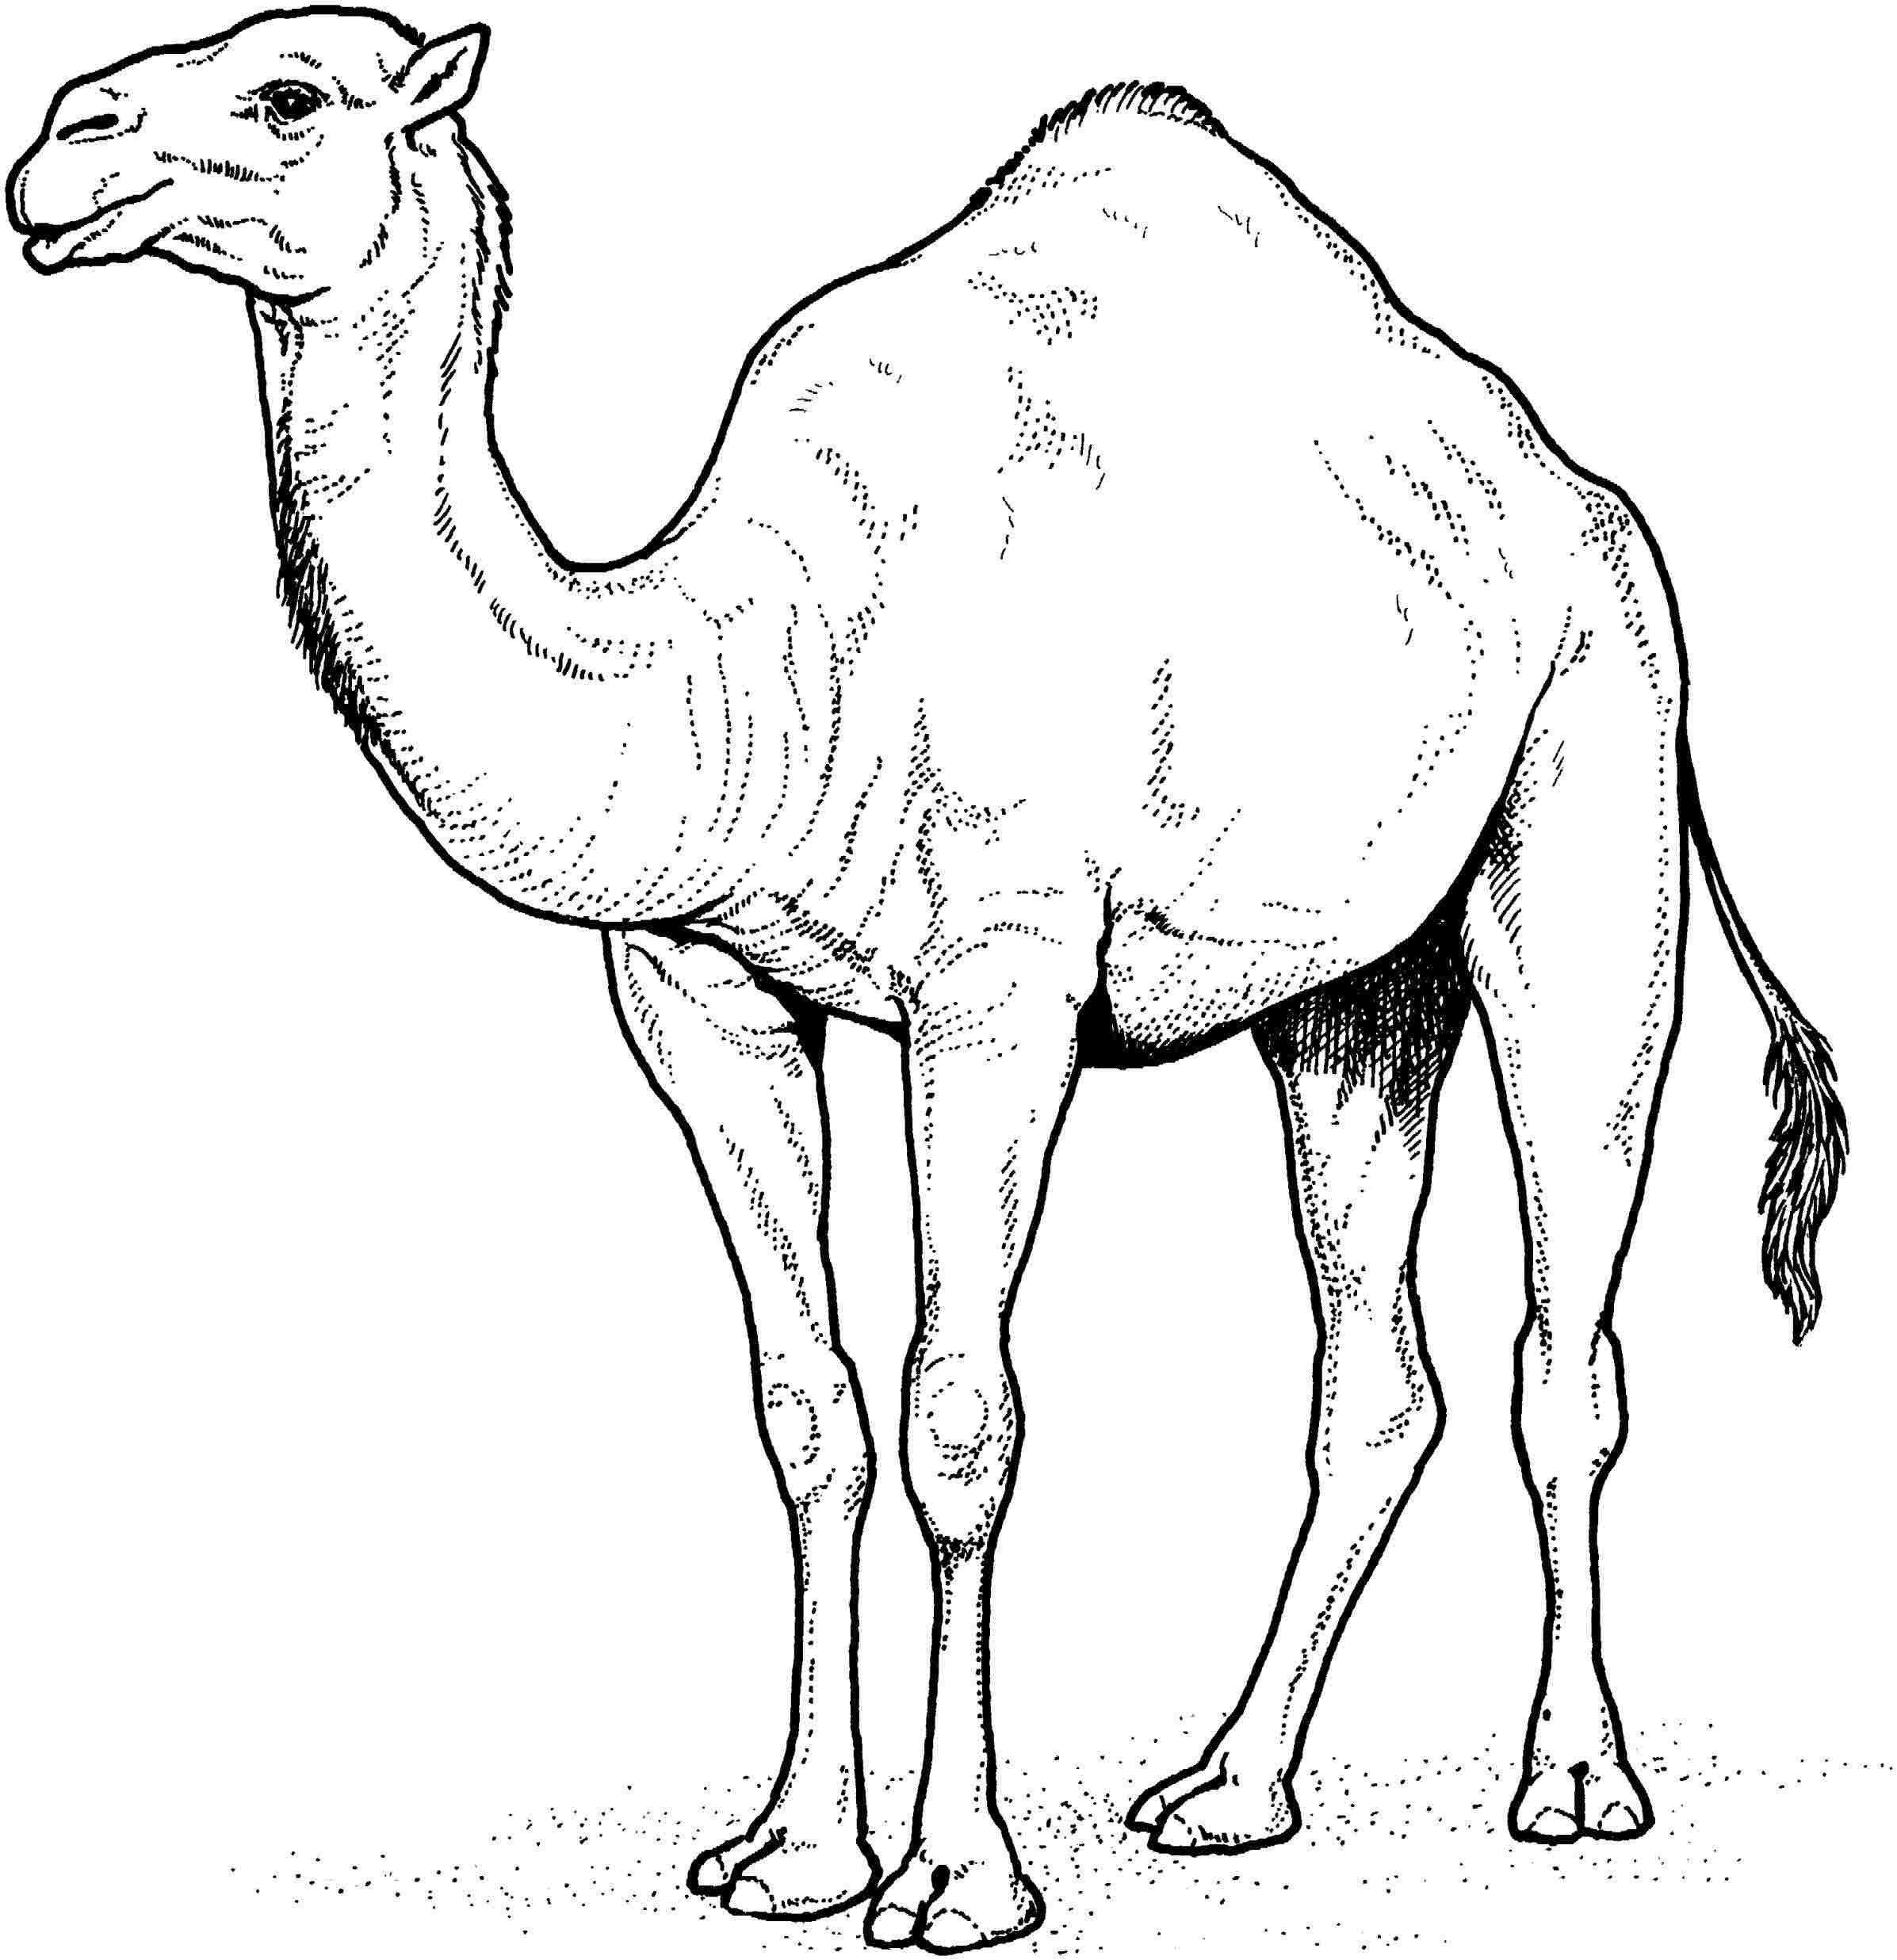
Before you put pencil to paper, a basic understanding of camel anatomy will significantly enhance your camel drawing. There are two main types of camels: the Dromedary (one hump) and the Bactrian (two humps). * **Dromedary Camel:** Often called the Arabian camel, this species has a single, prominent hump. It's commonly found in the Middle East and North Africa. The drawing of the dromedary camel is complete once you capture this iconic feature. * **Bactrian Camel:** This camel boasts two humps and is native to Central Asia, including the historical region of Bactria. The Bactrian camel is also the largest mammal in its native range. When learning how to draw the Bactrian camel, step 1 often involves distinguishing these two humps clearly. Beyond the humps, consider these features: * **Body:** Large and robust, designed for endurance. * **Neck:** Long and gracefully curved, extending from the body to the head. * **Legs:** Long and sturdy, ending in broad, padded feet ideal for walking on sand. Add four vertical lines with slight bends to form the legs of the camel, ensuring they look strong and supportive. * **Head:** Relatively small compared to the body, with distinctive features like large eyes, long eyelashes (for sand protection), and a unique snout. * **Tail:** Short and tufted. To successfully draw a camel, you will use the basic rules for drawing any animal. First, you need to determine the aspect ratio of the body and the position of the camel on a piece of paper. Then, you should make a small sketch and determine the position of the camel body parts. This foundational planning is crucial for a well-proportioned camel drawing.Essential Art Supplies for Your Camel Drawing Adventure
You don't need a professional art studio to start your camel drawing journey. Simple tools are often the best for beginners. Here's what you'll typically need: * **Pencils:** A standard graphite pencil (HB or 2B is good for sketching) and perhaps a softer one (4B or 6B) for shading. * **Eraser:** A good quality kneaded eraser or a plastic eraser for clean corrections. * **Paper:** Any drawing paper will do, but a slightly thicker paper (like Bristol board) can handle more erasing and layering of colors. * **Optional Coloring Tools:** * **Colored Pencils:** Excellent for adding subtle colors and details. The data mentions "Staedtler colour pencil" as a good option. * **Crayons or Oil Pastels:** Great for vibrant, broad strokes, especially for a cartoon camel. "Titi oil pastels" were mentioned in the reference. * **Markers or Watercolors:** For bolder colors and different textures. Remember, the goal is to learn and have fun. Don't get too caught up in having the "perfect" supplies. As the saying goes, "It's not the brush, it's the artist." However, having basic, reliable tools can certainly make the process more enjoyable.The Foundational Steps: Starting Your Camel Drawing
Any animal drawing can seem daunting as you want to make it look as realistic as possible. However, drawing a camel is super easy when you break it down into simple shapes. We will guide you through the entire construction process, focusing on basic geometric forms. Use straightforward lines and shapes to make the process easy for beginners.Building the Body: Ovals and Lines
The very first step in your camel drawing is to establish the main body. 1. **Start with a simple oval shape for the body.** This will be the largest shape on your paper and will serve as the core of your camel. Think of it as the camel's torso. 2. **Determine the camel's pose.** Is it standing, sitting, or walking? This will influence the angle and placement of your initial oval. 3. **Add four vertical lines with slight bends to form the legs of the camel.** These lines should extend downwards from the oval body. Keep them light for now, as they are just guides.Shaping the Neck and Head
Next, we connect the body to the head. 1. **Draw two long, curved lines extending from the body to the camel’s neck.** These lines should start from the front of your body oval and curve upwards and slightly forwards. Imagine the graceful arc of a camel's neck. 2. **For the head, draw a rounded shape with a cute little snout** at the end of the neck. This can be another smaller oval or a circle, depending on the perspective. Keep it proportionate to the body. This initial sketch, made of simple ovals and lines, forms the skeleton of your camel drawing, ensuring correct proportions before you add details.Adding the Iconic Humps and Distinctive Features
With the basic structure in place, it's time to add the features that make a camel instantly recognizable. 1. **Add the humps on top, making them round and smooth.** * For a Dromedary camel, sketch a smaller oval shape at the end of the neck for the hump, or simply draw one large, smooth hump over the back of the body oval. * For a Bactrian camel, add two small bumps behind the head, positioned over the body oval. Ensure they are distinct but flow naturally from the camel's back.Detailing the Face: Eyes, Nose, and Mouth
The face is where your camel's personality will shine through. 1. **Add details to the camel’s face, such as the eyes, nose, and mouth.** 2. **For the eyes:** Draw a large standing oval shape on the camel’s face near its ear. This forms the outline of the camel’s eye. Shade a small circle within each eye to create the pupil, giving it life. Don't forget the big, friendly eyes! 3. **For the nose:** Draw an upward curve shape with a short slightly curved vertical line at the bottom. This creates the nose of the camel right above its mouth. Draw a teardrop shape to indicate the nostril. 4. **For the mouth:** Give it a wide smile if you're going for a happy, cartoon camel, or a subtle line for a more realistic look. 5. **Ears:** Draw two long ears on top of the head, proportionate to the face.The Finishing Touches: Tail and Legs
Almost there! These final elements complete your camel's form. 1. **Don’t forget the tail.** Draw a short line extending from the back of the body, with a small tuft at the end. 2. **Refine the legs:** Next, draw a small curved line from the lower part of its neck and connect it to the second leg, forming the chest and belly line. Refine the initial vertical lines for the legs, adding thickness and defining the joints and hooves (or padded feet). Remember that camels have thick, sturdy legs. By following these steps, your camel drawing will start to take on a complete and recognizable form.Bringing Your Camel to Life: Shading and Coloring Techniques
Once the outline of your camel drawing is complete, you can bring it to life with shading and color. This is where your camel truly gains depth and character. * **Shading for Realism:** If you're aiming for a realistic camel, use your softer pencils to add shadows. Observe how light falls on the humps, neck, and legs, creating areas of light and dark. Shading around the humps will give them a three-dimensional appearance. Pay attention to the texture of the camel's fur, using short, directional strokes. * **Coloring:** Camels typically have sandy, brown, or reddish-brown coats. * **Colored Pencils:** Allow for precise layering and blending, perfect for subtle variations in fur color and detailed shading. * **Oil Pastels/Crayons:** Offer vibrant, opaque colors, ideal for a more stylized or cartoon camel drawing. They can create a rich, textured look. * **Watercolors:** Provide a softer, more translucent effect, great for capturing the desert light. When coloring, think about the environment. A camel in the desert might have dust on its lower legs, or its fur might appear lighter in direct sunlight. This attention to detail elevates your camel drawing from a simple sketch to a captivating piece of art.Cartoon Camel Drawing: A Simplified Approach for Fun
If realism isn't your primary goal, or if you're drawing with children, a cartoon camel drawing offers a wonderfully fun and forgiving alternative. The principles are similar, but the emphasis is on simplicity and exaggerated features. * **Simplified Shapes:** Begin the cartoon camel outline by drawing its face with a rounded shape. Start with an oval shape for the body. Next, draw two humps on top, making them more like distinct, rounded bumps rather than flowing forms. * **Cute Features:** * Draw a short, cute snout and two long ears on top. * For the humps, add two small bumps behind the head. * Shade a small circle within each eye, and draw a teardrop shape to indicate the nostril, but feel free to make the eyes larger and more expressive. * Finally, give it a wide smile, and you’ve got yourself a happy, cartoon camel! This approach makes drawing a camel super easy when you break it down, focusing on creating a charming and friendly character rather than anatomical precision. It’s perfect for a quick sketch or a fun art project with kids.Beyond the Basics: Enhancing Your Camel Drawings
Once you're comfortable with the fundamental steps of camel drawing, you can explore more advanced techniques to make your artwork truly stand out. * **Varying Poses:** Experiment with different camel poses. A camel standing majestically, one kneeling, or even a group of camels walking across the desert. Understanding basic perspective will help you draw camels in various positions. * **Adding Backgrounds:** Place your camel in its natural habitat. Simple sand dunes, a distant oasis, or a starry desert night can add context and depth to your camel drawing. This helps tell a story with your art. * **Expressing Personality:** Camels, despite their stoic appearance, can convey a range of emotions. Through slight adjustments to the eyes, mouth, and head tilt, you can make your camel look curious, tired, determined, or even grumpy. * **Experiment with Mediums:** Don't limit yourself to pencils. Try ink, pastels, charcoal, or even digital art. Each medium offers a different texture and feel, allowing you to discover new ways to express your camel drawing. The reference mentions using "titi oil pastels & staedtler colour pencil," which are great starting points for exploration. * **Reference Materials:** For the first time, get 1 free month of iStock exclusive photos, illustrations, and more. High-quality reference images are invaluable for capturing realism and detail. You can also find and save ideas about camel drawing on Pinterest, which is a treasure trove of inspiration. Remember, art is a journey of continuous learning and experimentation. Each camel drawing you create is a step forward in your artistic development.Conclusion: Your Artistic Journey Continues
Drawing a camel can be a delightful and straightforward task with these steps. We've explored everything from the fascinating anatomy of these desert survivors to the essential art supplies and the step-by-step process of bringing them to life on paper. Whether you're doing it for fun or as a learning activity, these instructions will help you create a beautiful camel drawing that you can be proud of. From the initial oval for the body to the final shading of the humps and the friendly eyes, you've gained the knowledge and confidence to sketch this iconic desert animal. Remember, practice makes perfect, and every line you draw is a step towards improving your skills. Now it's your turn! Pick up your pencils and start your own camel drawing adventure. We'd love to see your creations! Share your thoughts in the comments below, or even better, share your camel drawing with us on social media. For more drawing videos and tutorials, consider subscribing to our channel for continuous inspiration and guidance. Happy drawing!- Goat Farm Near Me
- Low Porosity Hair
- Kathie Lee Gifford Nude
- 16 And Pregnant
- Detroit Lions Vs 49ers Match Player Stats
How to Draw a Camel · Art Projects for Kids
Easy Camel Drawing at PaintingValley.com | Explore collection of Easy

How to Draw a Camel - HelloArtsy
