How To Draw A Bear: Your Complete Guide To Sketching Furry Friends
Embarking on a creative journey often leads us to explore the captivating world of animal art. Among the most iconic and beloved creatures to sketch, learning how to draw a bear stands out as a particularly rewarding challenge. With their distinctive rounded bodies, expressive faces, and unique features, bears offer an exciting subject for artists of all levels. Whether you're celebrating National Teddy Bear Day or simply nurturing a newfound passion for drawing, mastering the art of sketching these magnificent animals can be an incredibly fun and enriching experience.
Many aspiring artists find themselves wondering where to begin when tackling complex subjects like wildlife. If you've ever struggled to draw a bear before, chances are that you didn't have the right steps to follow. The truth is, it's actually quite simple when you break it down into manageable stages. This comprehensive guide is designed to equip you with the knowledge and techniques needed to confidently create your own furry bear illustrations, from simple cartoon renditions to more realistic grizzly bear sketches. We'll progressively build upon each previous step, ensuring a smooth and enjoyable learning process until you achieve a final rendering you'll be proud to show off to everyone.
Table of Contents
- Why Learn How to Draw a Bear?
- Essential Tools for Your Bear Drawing Journey
- Understanding Bear Anatomy: Proportions and Perspective
- Breaking Down the Bear: Step-by-Step Drawing Process
- From Simple to Realistic: Techniques for Different Styles
- Adding Life to Your Bear: Fur, Shading, and Color
- Exploring Bear Species: Facts and Features for Artists
- Practice Makes Perfect: Tips for Continuous Improvement
Why Learn How to Draw a Bear?
Drawing animals is an enjoyable challenge for many artists, and bears, with their diverse forms and captivating presence, are particularly rewarding subjects. Beyond the sheer pleasure of creation, learning how to draw a bear offers numerous benefits. It hones your observational skills, requiring you to pay close attention to proportions, textures, and expressions. Bears symbolize strength, wilderness, and often, cuddly comfort (especially teddy bears!), making them emotionally resonant subjects. From the formidable grizzly to the playful panda, each species presents unique artistic opportunities. By understanding their fundamental anatomy and characteristics, you unlock the ability to depict them in various styles, whether you aim for a lifelike portrait or a charming cartoon. This artistic endeavor not only improves your technical drawing abilities but also deepens your appreciation for these magnificent creatures, making the entire process a truly enriching experience.Essential Tools for Your Bear Drawing Journey
Before you dive into the exciting process of learning how to draw a bear, it's crucial to gather the right materials. Thankfully, you don't need an extensive art studio to get started. The beauty of drawing lies in its accessibility. Here’s a list of fundamental tools that will serve you well:- Pencils: A range of graphite pencils (e.g., HB for outlines, 2B for shading, 4B or 6B for darker tones) will give you versatility.
- Eraser: A good quality kneaded eraser or a vinyl eraser is essential for correcting mistakes and lifting graphite for highlights.
- Paper: Standard drawing paper or even good quality printer paper will work. If you plan to add color, consider slightly thicker paper that can handle markers or watercolors without bleeding or buckling.
- Coloring Mediums (Optional): Colored pencils, markers, crayons, or watercolors can bring your bear to life.
- Reference Images: While this guide provides the steps, having a few photos of real bears (or teddy bears!) can be incredibly helpful for understanding details and expressions.
Understanding Bear Anatomy: Proportions and Perspective
To create a truly convincing bear illustration, whether realistic or stylized, a foundational understanding of bear anatomy, proportions, and perspective is key. Bears, despite their varied species, share common structural elements that define their appearance. Their bodies are generally robust and rounded, supported by powerful limbs. The head is often large in proportion to the body, with a distinctive snout and relatively small, rounded ears. When you learn how to draw a bear, paying attention to these details will elevate your art. Proportions dictate the size relationship between different parts of the bear – how big is the head compared to the body? How long are the legs relative to the torso? For instance, a grizzly bear has a noticeable shoulder hump, while a polar bear has a more elongated neck. Perspective, on the other hand, deals with how objects appear in space, creating depth and dimension. Even for a simple cartoon bear, understanding how the form recedes or projects will make it look more three-dimensional. Follow the tips on proportions, perspective, and details to create a realistic grizzly bear sketch or any other bear species you desire. Start by thinking of the bear in terms of basic shapes like ovals and circles for the head and body, and cylinders for the limbs. This simplifies the complex form into manageable components, making the entire process of how to draw a bear much less intimidating.Breaking Down the Bear: Step-by-Step Drawing Process
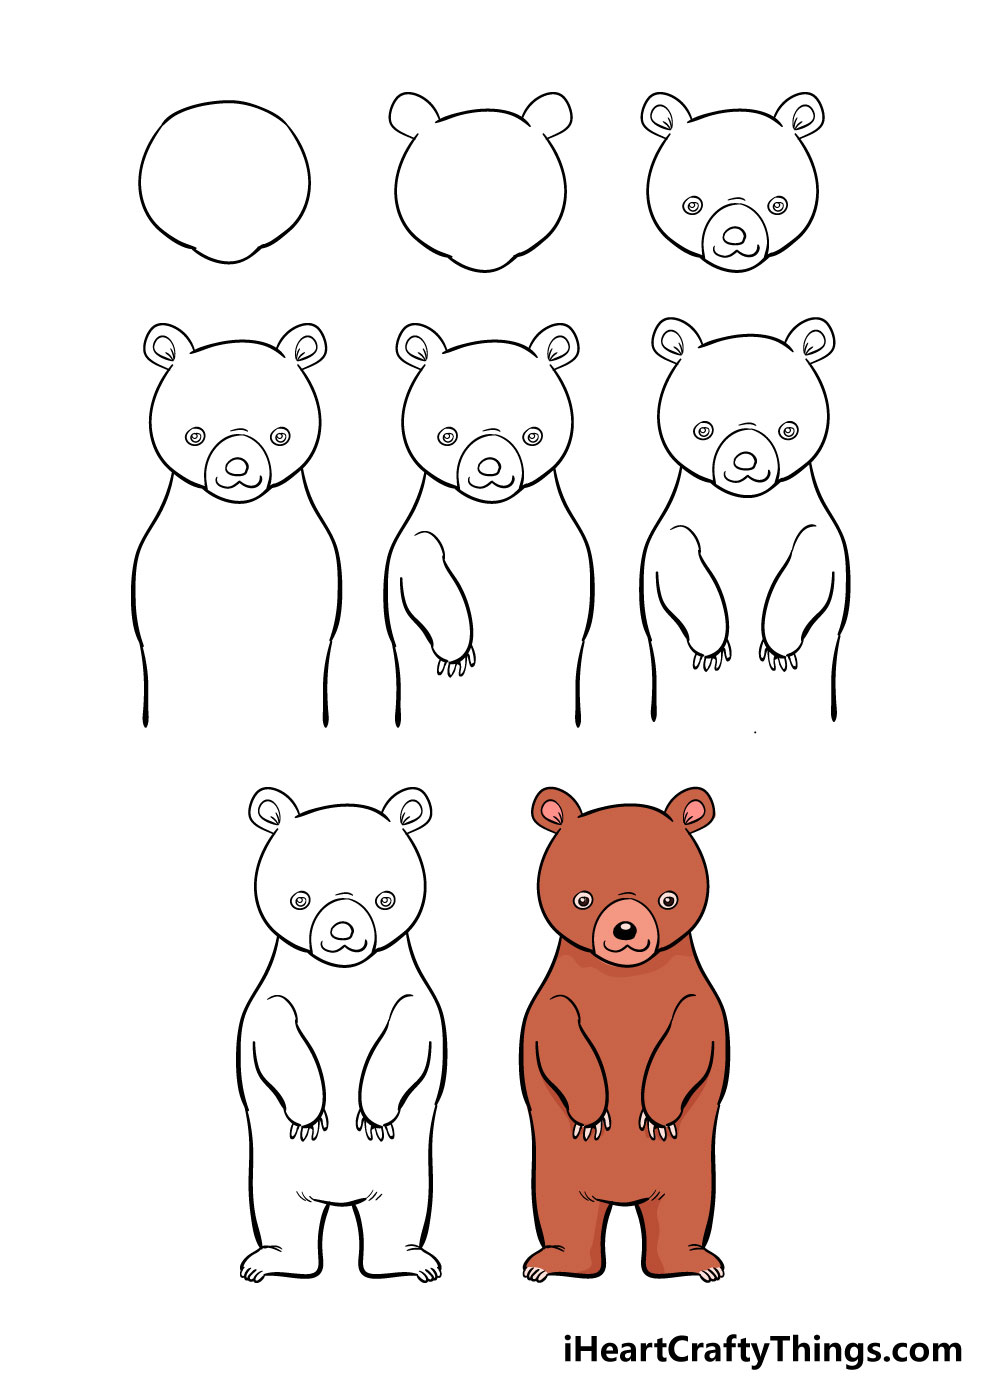
Learning how to draw a bear might seem daunting at first, but it becomes surprisingly simple when you break it down into a series of easy, progressive steps. This step-by-step lesson progressively builds upon each previous step until you get to the final rendering of a bear. We'll guide you through the process, transforming basic shapes into a recognizable furry friend. Many artists find that following a structured guide, like the one we're about to present, is the most effective way to overcome initial struggles and build confidence. We'll aim for a comprehensive approach, combining elements often found in guides that teach how to draw a bear in 6 easy steps or even 9 easy steps, ensuring you get a thorough understanding.Step 1: The Basic Shapes and Outline
Every great drawing starts with a strong foundation. When you begin to draw a bear, think of its overall form in terms of simple geometric shapes. Start by drawing a boxy oval shape for the head. This initial oval doesn't have to be perfect; it's just a guide. Below and slightly overlapping this, draw a larger, more rounded oval for the main body. This will be the torso of your bear. These foundational shapes establish the overall size and pose of your bear. For the muzzle area, you can sketch a smaller oval extending from the lower part of the head oval. This initial sketch should be light, using a pencil that allows for easy erasing, as these lines will be refined later. This simple beginning is crucial for setting up the correct proportions and overall structure, making the subsequent steps much smoother.Step 2: Defining the Face and Features
With the basic head shape in place, it's time to bring your bear's face to life. This is where your bear's personality will begin to emerge. Begin the cartoon bear outline by drawing the bear's face. For the eyes, draw two circles with smaller circles inside them, representing the pupils. Position them appropriately on the upper half of the head oval. Use a curved line for the top of the snout, extending from the muzzle oval you drew in the previous step. Below this, draw an inverted triangle or an irregular oval for the nose. For the mouth, a simple curved line or two small curves can indicate a friendly expression. Small wavy lines can be used to contour around the eyes, adding a bit of character and indicating the brow area. Don't forget the ears; draw two small, rounded shapes on the top sides of the head. This step is crucial for capturing the expressive qualities of your bear, whether you're aiming for a fierce grizzly or a cute teddy bear.Step 3: Adding the Limbs and Body Structure
Now that the head and body are outlined, it’s time to give your bear its powerful limbs. Think of the legs as a series of connected cylindrical or oval shapes. For the forelegs, draw two elongated ovals extending downwards from the front part of the body oval. These will form the upper and lower parts of the front legs. Similarly, for the hind legs, draw two larger, more rounded ovals extending from the back and lower part of the body. These should be thicker to suggest the bear's strong thighs. At the bottom of each leg, sketch in the paws. For a simple bear, these can be rounded shapes. For more detail, you can use small triangles or trapezoids to indicate the structure of the feet, remembering that bears are plantigrade, meaning they walk on the soles of their feet. Pay attention to the joints – elbows and knees – ensuring they align naturally with the body. This step lays down the foundational structure for your bear, allowing you to later refine the contours and add muscle definition.Step 4: Refining the Outline and Adding Detail
With the basic structure in place, it's time to refine your bear's outline and add the details that make it unique. Connect all the initial shapes with smoother, more confident lines, erasing any overlapping guide lines from your initial sketch. This is where you truly start to sculpt the form of your bear. Pay attention to the contours of the body, giving it a natural, rounded appearance. Begin to add fur texture by using short, choppy lines along the edges of the body, legs, and face. These lines should follow the direction of the fur growth. For a realistic grizzly bear sketch, consider adding the distinctive shoulder hump and powerful neck muscles. For the eyes, add pupils and perhaps a small highlight to give them life. Refine the shape of the nose and mouth. This step is about transitioning from a skeletal framework to a fully formed creature. Follow the guide to sketch the bear outline, add fur texture, and prepare the illustration for shading and coloring.From Simple to Realistic: Techniques for Different Styles
The beauty of learning how to draw a bear lies in its versatility; you can adapt your approach to create various styles, from charming cartoons to highly detailed realistic depictions. For a **simple and easy bear drawing**, especially perfect for kids and artists of all ages just starting out, focus on basic shapes and minimal lines. You can create a cute bear art piece by emphasizing large, expressive eyes, a small nose, and a rounded, simplified body. Begin the cartoon bear outline by drawing the bear's face with exaggerated features. Follow along to create a cartoon bear that you can show off to everyone, perhaps against a backdrop of rolling mountains, as a simple bear's head drawing. This style is about capturing the essence of a bear with a playful, approachable feel. If your goal is to learn how to draw a **realistic grizzly bear**, the process demands more attention to detail, proportions, and texture. In this drawing lesson, you'll delve deeper into anatomical accuracy. Focus on the subtle curves of the body, the powerful musculature, and the unique features of the grizzly, such as its shoulder hump and long claws. I try to offer some helpful tips on sketching, shading, and detailing, using my favorite techniques. This involves layering your pencil strokes to build up fur texture, paying close attention to light sources for accurate shading, and adding fine details like whiskers or individual strands of fur. The transition from basic shapes to a realistic rendering requires patience and observation, but the results are incredibly rewarding, showcasing the majestic power of the bear.Adding Life to Your Bear: Fur, Shading, and Color
Once your bear's outline and basic details are in place, the next crucial steps are adding texture, depth, and vibrancy. This is where your bear truly comes to life. **Adding Fur Texture:** Bear fur isn't uniform; it varies in length, density, and direction. To add fur texture, use short, overlapping strokes that follow the natural flow of the fur. For a shaggy look, make your strokes slightly irregular. For a smoother coat, keep them tighter and more consistent. Pay attention to areas like the muzzle, ears, and paws, where the fur might be shorter or denser. Layering these strokes will create a convincing furry appearance. **Shading for Depth:** Shading is what transforms a flat drawing into a three-dimensional form. Identify your light source – where is the light coming from? Areas facing the light will be brightest, while areas away from it will be darker. Use your pencil to build up tones gradually, from light grays to deep blacks. Cross-hatching, blending, or stippling are all valid techniques. Pay attention to shadows cast by the bear itself (e.g., under the chin, where legs meet the body) and subtle shadows on the fur to indicate its roundness. This step progressively builds upon each previous step until you get to the final rendering of a bear with impressive depth. **Coloring Your Cute Bear Art:** If you choose to add color, select a palette that reflects the bear species you're drawing. Brown bears, black bears, polar bears – each has a distinct hue. Use pencil, eraser, and color to create your own furry bear. Layer your colors, starting with lighter tones and gradually adding darker shades for depth and richness. For fur, use short, directional strokes with your colored pencils or markers to mimic the texture. Blending colors can create smooth transitions and realistic variations in the fur. Whether you opt for a realistic color scheme or a whimsical one for a cartoon bear, thoughtful application of color will make your bear art pop.Exploring Bear Species: Facts and Features for Artists
To truly master how to draw a bear, it's incredibly helpful to understand the diversity within the bear family. All over the world, around 8 species are found, each with unique features that make them distinct and fascinating subjects for artists. Knowing these differences allows you to create more accurate and engaging drawings. * **Brown Bears (including Grizzlies and Kodiak Bears):** Known for their large size, a prominent shoulder hump, and a dished face profile. Their fur color varies widely from light blonde to dark brown. When you learn how to draw a grizzly bear with us, you'll focus on these powerful features. * **Black Bears:** Generally smaller than brown bears, with a straighter face profile and no shoulder hump. Despite their name, their fur can range from black to cinnamon or even white. * **Polar Bears:** Instantly recognizable by their pure white fur (which is actually translucent, appearing white due to light reflection), long necks, and streamlined bodies adapted for swimming. * **Panda Bears:** Iconic for their distinctive black and white markings, round faces, and stocky bodies. They have a unique "thumb" (an extended wrist bone) for gripping bamboo. * **Sun Bears:** The smallest bear species, characterized by their sleek, short black fur and a distinctive golden or cream-colored patch on their chest, often shaped like a crescent or circle. * **Sloth Bears:** Native to India and Sri Lanka, they have shaggy, long black fur, a long snout, and a distinctive V-shaped white mark on their chest. * **Asiatic Black Bears (Moon Bears):** Similar to American black bears but with a more pronounced white crescent mark on their chest and larger ears. * **Spectacled Bears:** Found in South America, they are named for the distinctive cream-colored markings around their eyes that resemble spectacles. Find out facts about different bear species and their features, and use pencil, eraser, and color to create your own furry bear that accurately represents its kind. Observing these unique characteristics will greatly enhance your ability to draw a bear with authenticity and character.Practice Makes Perfect: Tips for Continuous Improvement
Learning how to draw a bear, or any complex subject, is a journey, not a destination. Consistent practice is the most effective way to hone your skills and see significant improvement over time. Don't be discouraged by initial attempts that don't quite meet your expectations. Every line, every smudge, and every correction is a learning opportunity. Here are some tips to help you continue growing as an artist:- Draw Regularly: Even short drawing sessions a few times a week are more beneficial than infrequent, long ones. Consistency builds muscle memory and sharpens your eye.
- Use Reference Photos: Continuously study real bears from various angles and in different poses. This helps you understand their anatomy and how light interacts with their fur.
- Experiment with Styles: Don't limit yourself to just one style. Try drawing cartoon bears, then attempt a more realistic one. Experiment with different coloring mediums. This broadens your artistic vocabulary.
- Focus on Fundamentals: Revisit basic principles like proportions, perspective, and shading often. A strong foundation makes drawing complex subjects much easier.
- Seek Feedback: Share your work with trusted friends, fellow artists, or online communities. Constructive criticism can provide valuable insights for improvement.
- Embrace Mistakes: Think of mistakes as stepping stones. They highlight areas where you need more practice or a different approach.
- Enjoy the Process: Remember why you started drawing in the first place – for the joy of creation. Have fun celebrating by following your artistic instincts and letting your creativity flow.
Conclusion
Learning how to draw a bear is a rewarding artistic endeavor that combines foundational drawing techniques with an appreciation for wildlife. We've explored everything from the essential tools you'll need to the step-by-step process of building your bear from basic shapes to refined details. We also delved into techniques for creating both simple cartoon bears and realistic grizzly sketches, emphasizing the importance of fur texture, shading, and color. Furthermore, understanding the unique features of different bear species can significantly enrich your artistic output. Remember, the key to mastering any drawing skill lies in consistent practice and a willingness to experiment. Don't be afraid to try new approaches or to revisit steps that challenge you. Whether you're a beginner or an experienced artist, this guide on how to draw a bear is perfect for everyone. So pick up your pencil, follow these steps, and unleash your creativity. We hope you had fun celebrating your artistic journey by following along. Now it's your turn: share your bear drawings in the comments below, or tell us which bear species you'd like to draw next! Explore more drawing guides on our site to continue your artistic adventure.- Harry Dean Stanton
- Mpac Morristown Nj
- Kathie Lee Gifford Nude
- Polar Express St Louis
- William Petersen
Bear Drawing - How To Draw A Bear Step By Step!
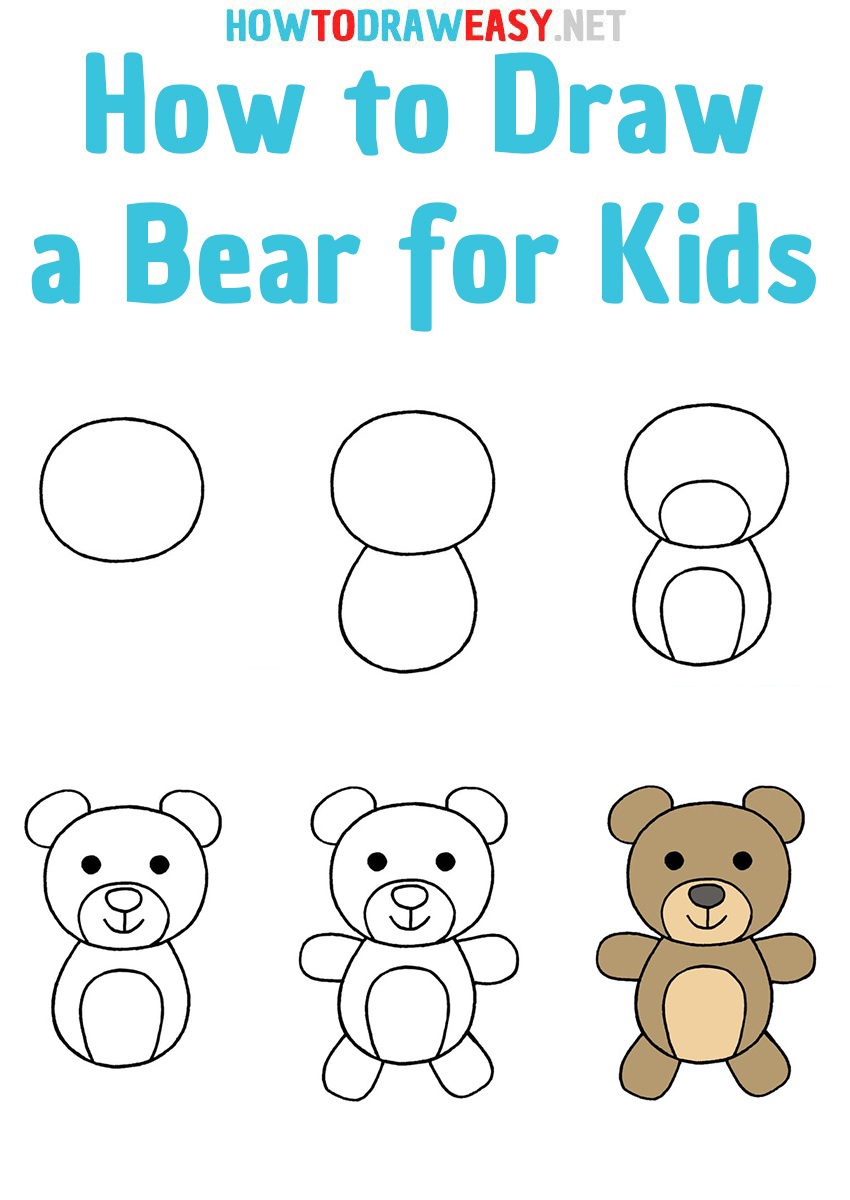
How to Draw a Bear for Kids - How to Draw Easy
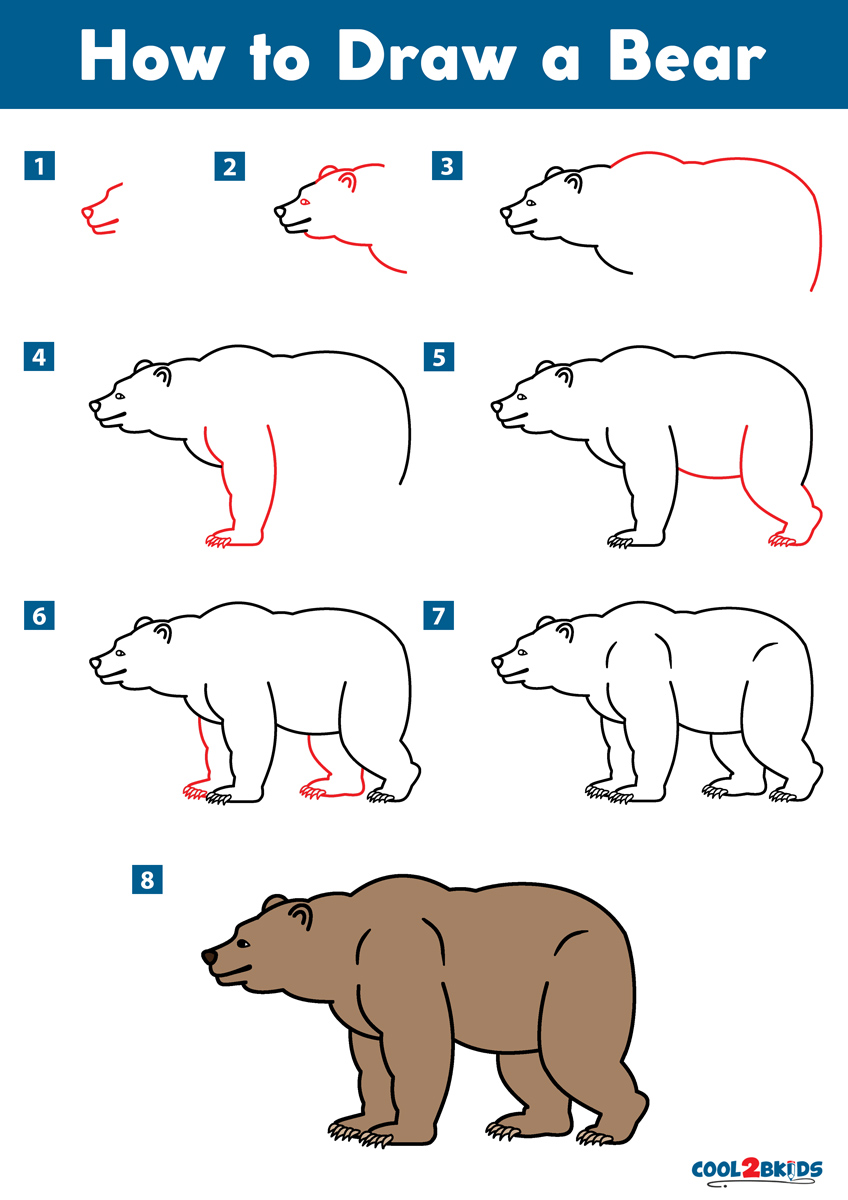
How to Draw a Bear - Cool2bKids
