Mastering The Majestic Tiger: Your Ultimate Drawing Guide
Drawing a tiger can be an exhilarating and gratifying artistic endeavor, allowing you to capture the raw power and exquisite beauty of one of nature's most magnificent creatures. Whether you're fascinated by wildlife, interested in capturing the essence of these striped felines, or simply aiming to expand your drawing repertoire, learning how to draw a tiger is a rewarding journey that builds fundamental artistic skills. This comprehensive guide will lead you through essential steps to create a realistic or stylized representation of a tiger, from the initial sketch to the final details.
Tigers, the most prominent members of the cat family, rivaled only by the lion in strength and ferocity, possess a unique allure that makes them a popular subject for artists. Their distinctive stripes, powerful physique, and piercing gaze offer a wealth of artistic opportunities. This tutorial is designed to be fun, simple, and perfect for artists of all ages, whether you're a complete beginner or looking to refine your big cat drawing skills. Let's dive into the fascinating world of tiger art!
Table of Contents
- Why Draw a Tiger?
- Essential Tools & Materials for Your Tiger Drawing Journey
- Understanding Tiger Anatomy: The Foundation of Realism
- Starting Your Tiger Sketch: Laying the Groundwork
- Building the Body: Legs, Tail, and Musculature
- Adding Distinctive Features: Stripes, Fur, and Details
- Exploring Different Tiger Styles and Poses
- Advanced Tips for Elevating Your Tiger Art
Why Draw a Tiger?
There's something uniquely captivating about tigers that draws artists to them. Perhaps it's their incredible power, their striking patterns, or their elusive nature. For many, the challenge of capturing their essence on paper is a deeply satisfying artistic pursuit. Learning how to draw a tiger isn't just about rendering an animal; it's about understanding form, light, shadow, and texture. It's an excellent way to practice your observational skills and improve your overall drawing proficiency. Plus, who doesn't love a super cute baby tiger, or the awe-inspiring image of a tiger roaring? The versatility of this subject allows for endless creative expression.Essential Tools & Materials for Your Tiger Drawing Journey
Before we begin drawing, it's important to gather all necessary materials. Having the right tools can make a significant difference in your drawing experience and the final outcome. You don't need the most expensive art supplies, but quality tools will certainly enhance your process.Sketching Tools: Precision & Control
For sketching, the choice of pencil is crucial. You'll want pencils that allow for very light lines initially, as these will serve as your guide lines and will be erased later.- Paper: Good quality drawing paper is essential. Look for paper that can withstand erasing without tearing or smudging too much.
- Pencils:
- 4H or H Pencil: An H pencil is a good choice when sketching because its hard lead allows for greater control. That way, you can create precise and fine lines and define the shapes of your tiger drawing. A 4H pencil is even lighter, perfect for those initial, barely-there guide lines. The sketch should be drawn in a way that allows you to discard it later—with very light lines, with an erasable tool, or on a separate layer if you're working digitally.
- 2B or Softer Pencils: As you move from sketching to defining your lines and adding details, you'll want softer pencils like a 2B, 4B, or even 6B. These provide nice dark lines and are excellent for shading and creating depth.
- Eraser: A good quality eraser is your best friend. A kneaded eraser is excellent for lifting graphite gently without smudging, while a vinyl eraser is good for more precise removal.
- Ruler (Optional but Recommended): Especially if you plan to use the grid method, a ruler will be invaluable.
- Reference Images: Gather several reference images of tigers in various poses, from realistic to cartoonish, for guidance. Observing real tigers will help you understand their anatomy and unique characteristics.
Coloring & Finishing Touches
Once your line art is complete, you might want to add color.- Color Pencils: These are versatile and allow for layering and blending. Larger packs are nice for more color choices.
- Markers: A permanent marker will give you a dark black color for outlining or filling in the stripes. This brand always makes nice dark lines.
- Pastels or Paints: For a more painterly approach, consider soft pastels, oil pastels, watercolors, or acrylics.
Understanding Tiger Anatomy: The Foundation of Realism
Before we begin drawing, it's important to set aside some time to familiarize yourself with tiger anatomy. Even if you've drawn other big cats, like lions and leopards, there are a few differences to take note of when drawing the striped feline. Tigers have a more muscular and compact build than lions, and their heads are generally rounder. Their powerful legs are built for explosive sprints and pouncing. Understanding these nuances will greatly enhance the realism of your drawing. Pay attention to:- Head Structure: The placement of eyes, nose, and mouth relative to each other. Notice the powerful jaw and the shape of the muzzle. How to draw a realistic tiger head starts with understanding its bone structure.
- Body Proportions: The length of the torso compared to the legs, and the overall balance of the animal.
- Legs and Paws: The musculature of the front and hind legs, and the distinct curve and padding of their large paws.
- Tail: The length and thickness of the tail, which acts as a counterbalance.
- Stripe Patterns: While unique to each tiger, there's a general flow and distribution of stripes that you should observe.
Starting Your Tiger Sketch: Laying the Groundwork
We'll start with a sketch, a set of guide lines that will become a base for the final lines. This is where you lay down the foundational shapes and proportions of your tiger. Remember to draw these lines very lightly, as they are meant to be erased later.The Power of the Grid Method
For beginners, or when aiming for precise proportions, the grid method is a great way to get the proportions just right for your drawing.- To start, lightly draw a grid with equal square measurements on your reference photo. Count them and take note of their number both vertically and horizontally.
- Lightly draw a similar grid on your drawing paper. Preferably, use a 4H pencil since we’ll erase these later on.
- Now, you can transfer the image square by square, focusing on one small section at a time. This breaks down the complex image into manageable parts, making it easier to maintain accuracy.
Initial Shapes: Head and Body
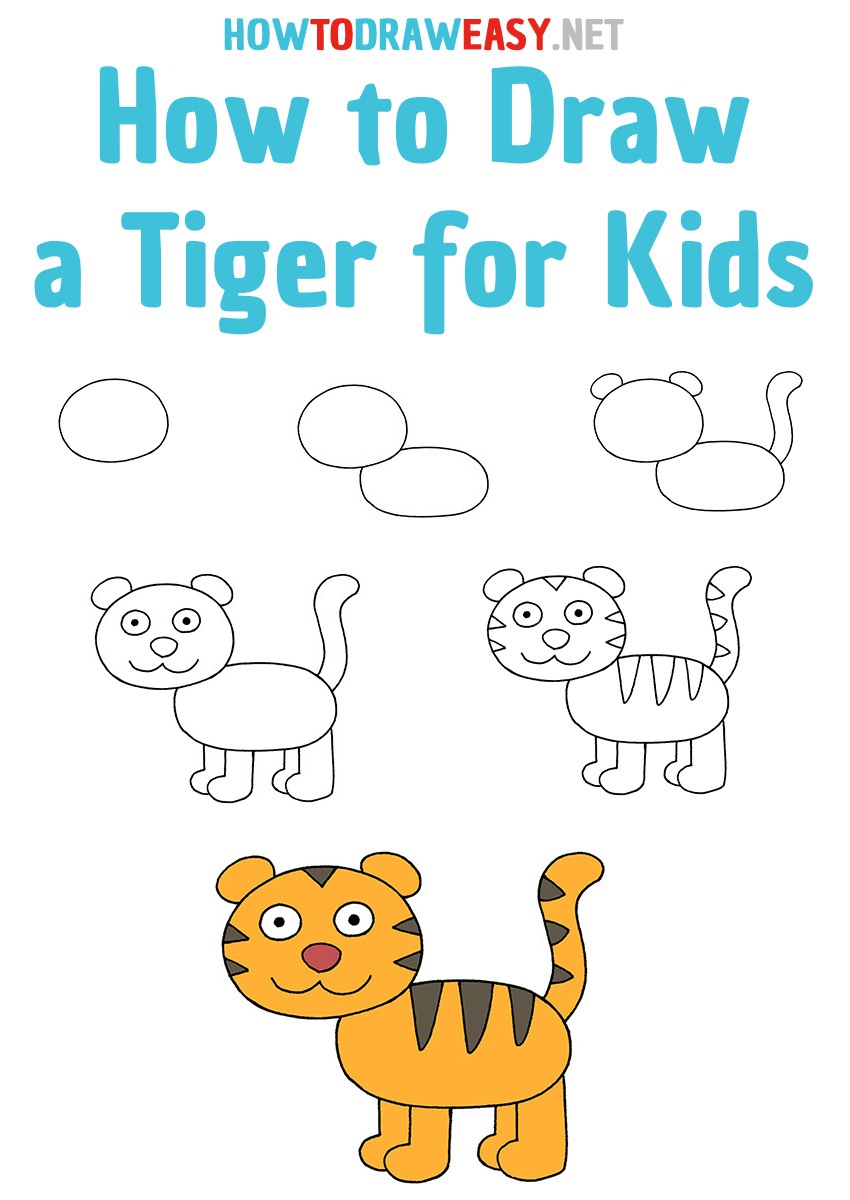
Regardless of whether you use a grid or freehand sketch, begin with basic geometric shapes to block out the main masses of the tiger.- Head: Start with a circle or an oval for the main part of the head. Add a smaller circle or oval for the muzzle area.
- Body: Sketch two overlapping ovals or circles for the torso – one for the chest area and one for the hindquarters. These basic oval shapes will be your guide for the body outline.
- Connecting Lines: Lightly connect these shapes with curved lines to suggest the spine and belly. This forms the basic silhouette of the tiger.
Building the Body: Legs, Tail, and Musculature
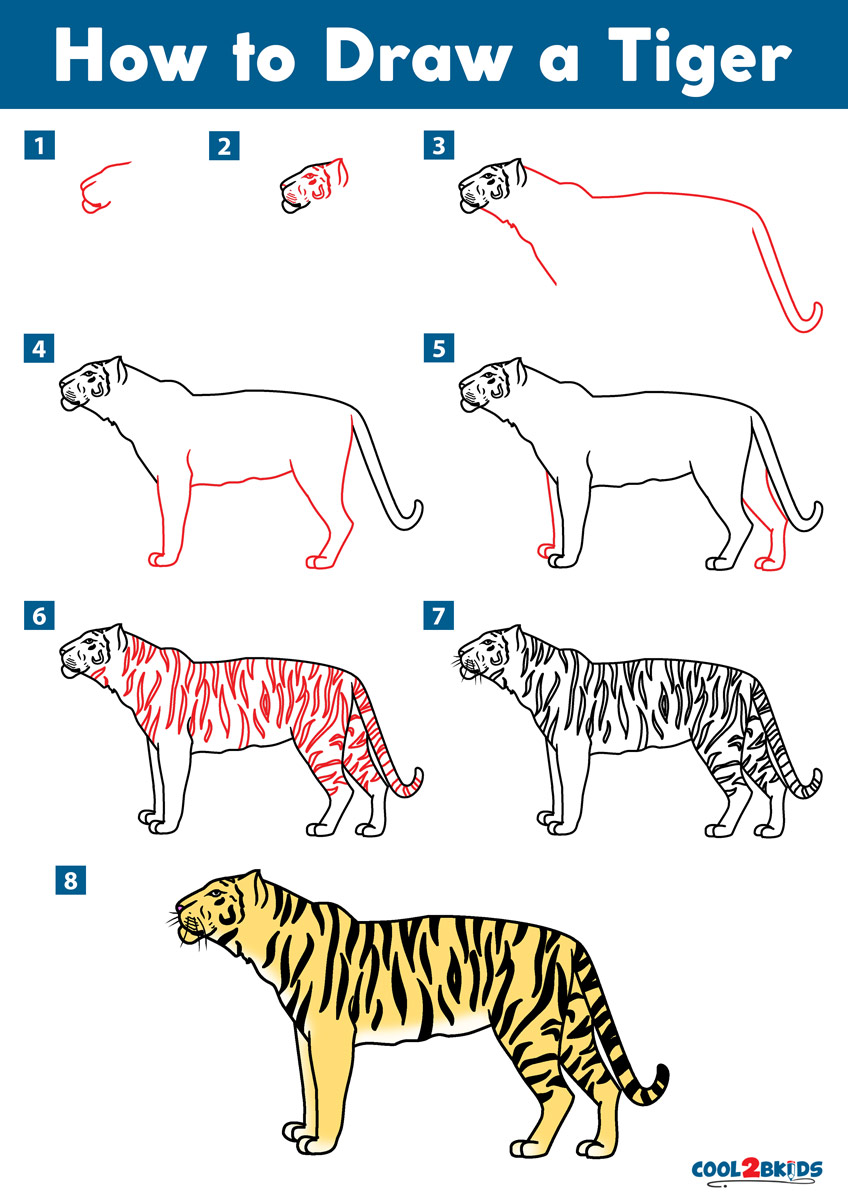
With the basic head and body shapes in place, it's time to build out the rest of the tiger's powerful form.- Outline the Body: In this step on how to draw a tiger, you will draw the outline of the body, following the basic oval shape you sketched in step 1. Refine the lines, making them flow smoothly from one section to another. Think about the natural curves of the back and belly.
- Draw the Legs: Now, you draw the front and hind legs. Start with simple cylindrical shapes to indicate the upper and lower leg segments. Think of them as tubes connected by joints.
- Refine Musculature and Paws: Gradually refine these cylindrical shapes to capture the musculature and the curve of the paws. Observe your reference photos closely to understand how the muscles bulge and taper. Pay special attention to the joints – shoulders, elbows, hips, and knees – as these define the leg's movement. For the paws, sketch large, rounded shapes, remembering that tigers have substantial, padded paws.
- Add the Tail: Sketch the tail as a long, tapering curve extending from the hindquarters. Its length and thickness should be proportionate to the body. A tiger's tail is often as long as its body and head combined, acting as a crucial counterbalance.
Adding Distinctive Features: Stripes, Fur, and Details
This is where your tiger truly comes to life! The details, especially the stripes and fur, are what make a tiger instantly recognizable. Learn how to draw a tiger from scratch, with guide lines, muscles, fur, details, and stripes.- Refine the Head:
- Eyes: Place the eyes, paying attention to their almond shape and the intense gaze. Add the tear ducts and the slight folds around them.
- Nose and Mouth: Sketch the distinct shape of the nose and the powerful muzzle. Define the mouth line, showing the powerful jaw.
- Ears: Add the rounded ears, noting their placement on the head.
- Whiskers: Lightly draw the points from which the whiskers emerge, and then the whiskers themselves.
- Add Fur Texture: Instead of drawing individual hairs, use short, directional strokes to suggest the flow of the fur. Observe how the fur lies differently on various parts of the body – shorter on the face, longer on the ruff and belly. This adds volume and realism.
- Draw the Stripes: This is the most iconic feature.
- Observation is Key: Study your reference images carefully. Tiger stripes are not uniform; they vary in thickness, length, and shape. They generally follow the contours of the body.
- Flow and Placement: Begin by sketching the general flow of the stripes on the head, body, legs, and tail. Notice how they often converge or break up.
- Irregularity: Embrace irregularity. No two stripes are exactly alike, and this natural variation makes your drawing more believable.
- Darken and Refine: Once you're happy with the placement, use a darker pencil (like a 2B or permanent marker) to darken and refine the stripes. Remember that the stripes are black against an orange or white background.
- Shadows and Highlights: Add shading to give your tiger depth and form. Observe where light hits your reference and where shadows fall. This will enhance the musculature and make your tiger appear three-dimensional.
Exploring Different Tiger Styles and Poses
Once you've mastered the basics, you can learn how to draw a tiger in different styles and positions. This adds versatility to your artistic repertoire.From Realistic to Cartoonish: Versatility in Your Art
Your approach can range from highly detailed realism to simplified, expressive cartoons.- Realistic Tiger: This involves meticulous attention to anatomy, fur texture, light, and shadow. The goal is to make the tiger look as lifelike as possible. You'll focus on subtle color variations, the glint in the eye, and the individual strands of fur. Learning how to draw a realistic tiger requires patience and keen observation.
- Cartoon Tiger: For a Kawaii cute cartoon tiger drawing lesson, you'll simplify shapes, exaggerate features (like larger eyes or a smaller nose), and use bold outlines. The focus here is on conveying personality and charm rather than strict anatomical accuracy. Think about how to draw a tiger easy, with simplified lines and expressive features. Austin and I are learning how to draw a super cute baby tiger, and it's so much fun!
- White Tiger: Learning how to draw a white tiger involves understanding how light and shadow play on white fur, and how the stripes appear against a lighter background. The principles of form and proportion remain the same, but the color palette changes.
Capturing Emotion: Roaring and Playful Cubs
Tigers exhibit a wide range of emotions and behaviors, and capturing these in your drawing can make your art more dynamic and engaging.- How to Draw a Tiger Roaring: This pose emphasizes the tiger's power and ferocity. Focus on the open mouth, bared fangs, tensed facial muscles, and the powerful neck. The eyes will often be narrowed or intensely focused.
- How to Draw a Tiger Standing: This is a classic pose that showcases the tiger's majestic posture and powerful build. Pay attention to the balance of weight on all four legs and the slight arch of the back.
- How to Draw a Tiger Cub (Step by Step): Tiger cubs are endearing and playful. Their proportions are different from adult tigers – larger heads relative to their bodies, rounder features, and softer expressions. Capturing their playful nature involves dynamic poses, perhaps pouncing or tumbling. This lesson is fun, simple, and perfect for artists of all ages.
Advanced Tips for Elevating Your Tiger Art
Once you've got the hang of the basics of how to draw a tiger, here are some tips to push your art further:- Practice Regularly: Consistency is key. The more you draw, the better you'll become. Subscribe for more tutorials like this every single day, and check out my sketch playlist below for more of your favourite animal drawings.
- Use Reference Photos Wisely: Don't just copy; understand. Analyze the anatomy, the light source, and the textures in your reference images.
- Experiment with Mediums: Try different pencils, charcoal, inks, or digital tools. Each medium offers unique possibilities.
- Study Light and Shadow: Understanding how light interacts with form is fundamental to creating realistic drawings. Practice rendering different lighting conditions.
- Focus on Details: The small details, like the texture of the nose, the individual whiskers, or the glint in the eye, can significantly enhance the realism and impact of your drawing.
- Patience is a Virtue: Drawing a complex subject like a tiger takes time. Don't rush the process. Enjoy each step of the creation.
- Learn from Others: Watch videos, follow artists you admire, and join drawing communities. You can follow along with the video or use the simple drawing steps below the video as a guide!
Drawing a tiger is a journey of observation, patience, and creativity. By following these step-by-step instructions and dedicating time to practice, you'll be able to create stunning tiger illustrations that capture the majesty and spirit of these incredible animals. Remember, every artist starts somewhere, and every stroke you make is a step towards improvement. So grab your pencils, find your inspiration, and start sketching your very own magnificent tiger today!
What's your favorite part about drawing big cats? Share your thoughts and your tiger drawings in the comments below!
- Mpac Morristown Nj
- Toy Shack Las Vegas
- Lauren Lavera
- La Doble Vida De Mi Esposo Multimillonario
- Hobby Airport
how to draw a tiger face - Herzog Anturtat
How to Draw a Tiger

How to Draw a Tiger in 4 Easy Steps | Design Bundles
