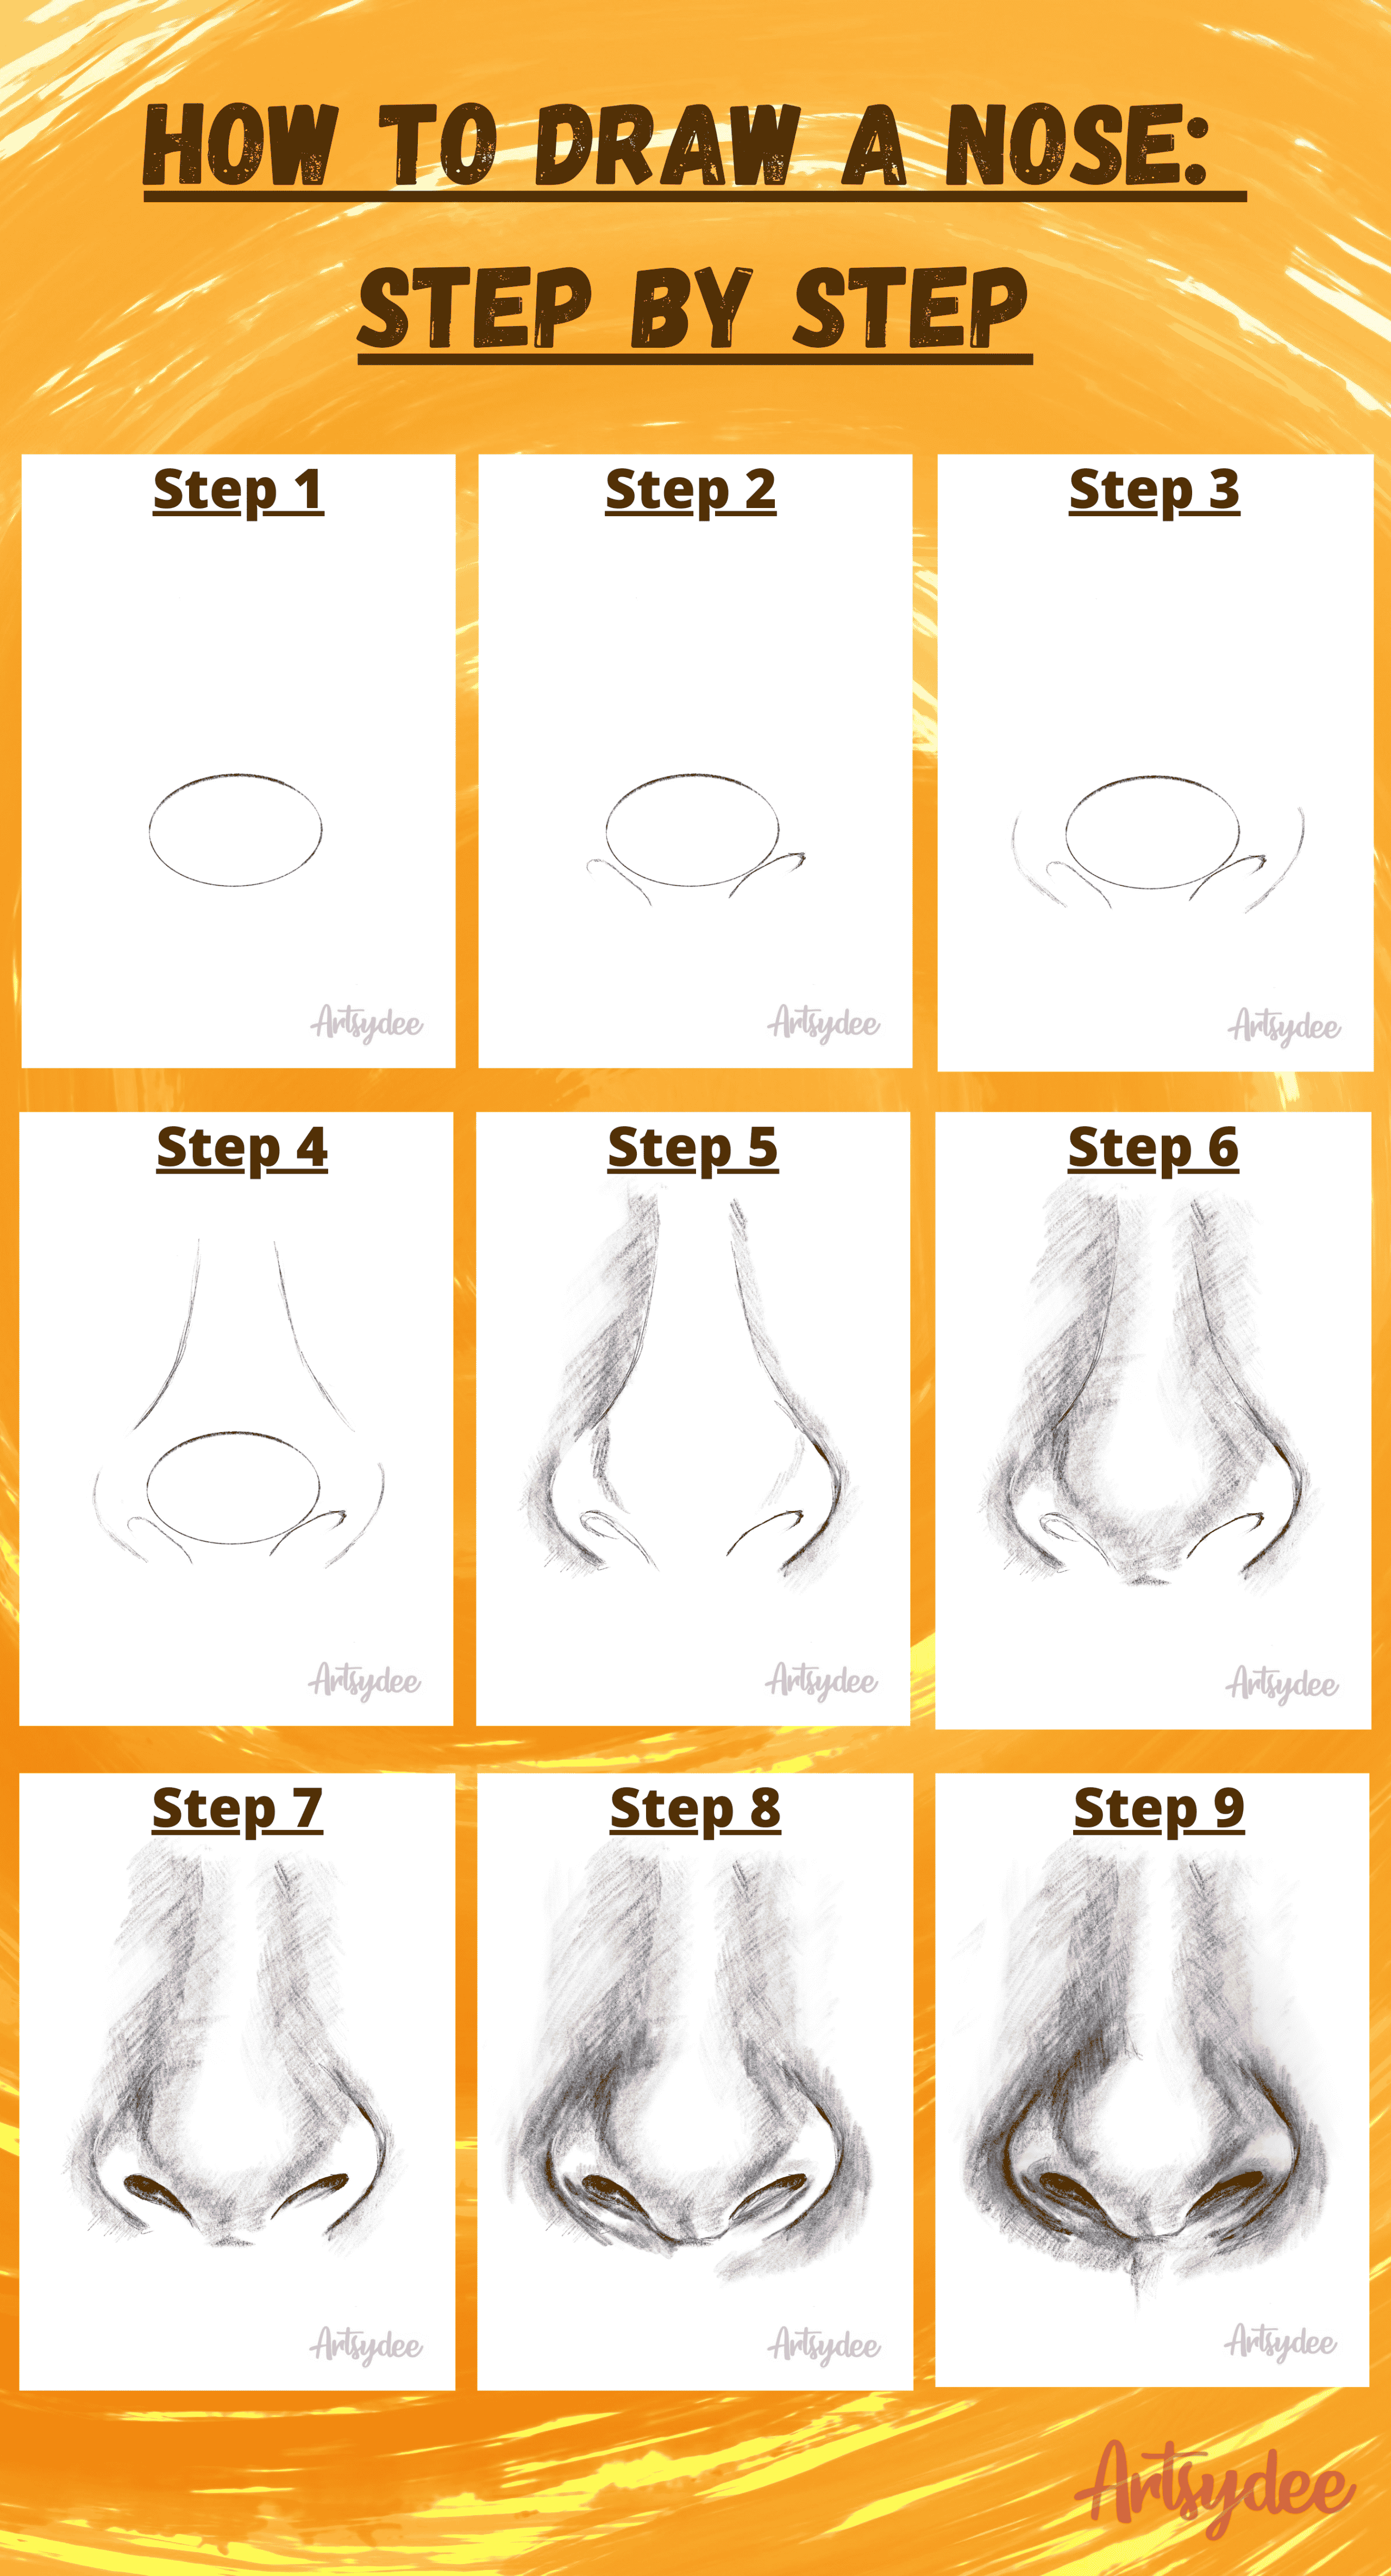
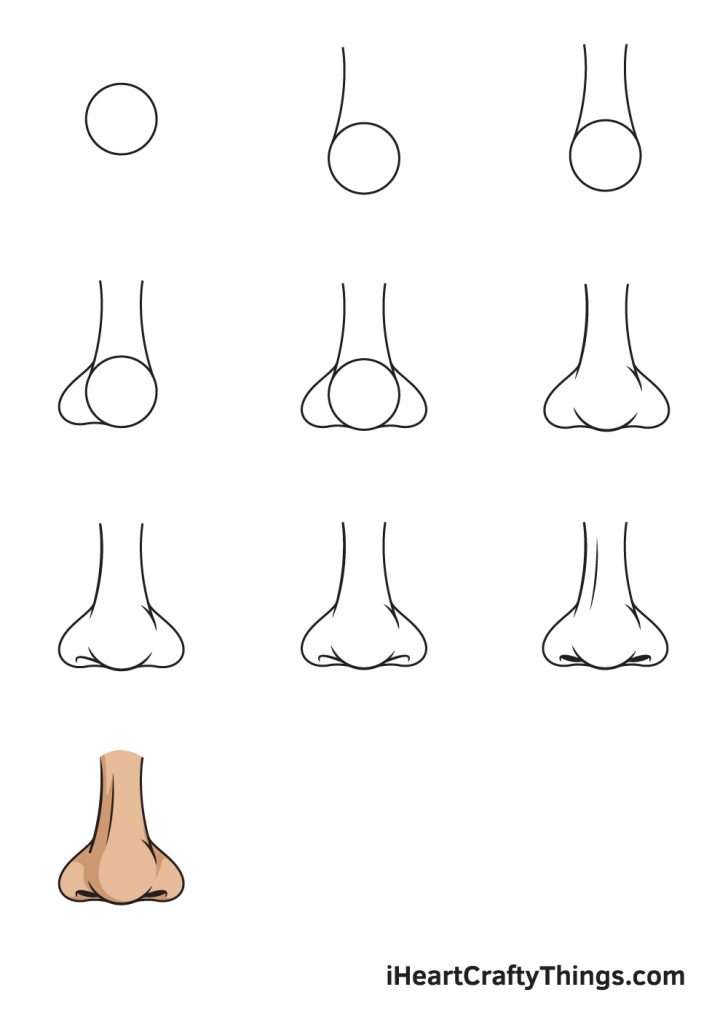
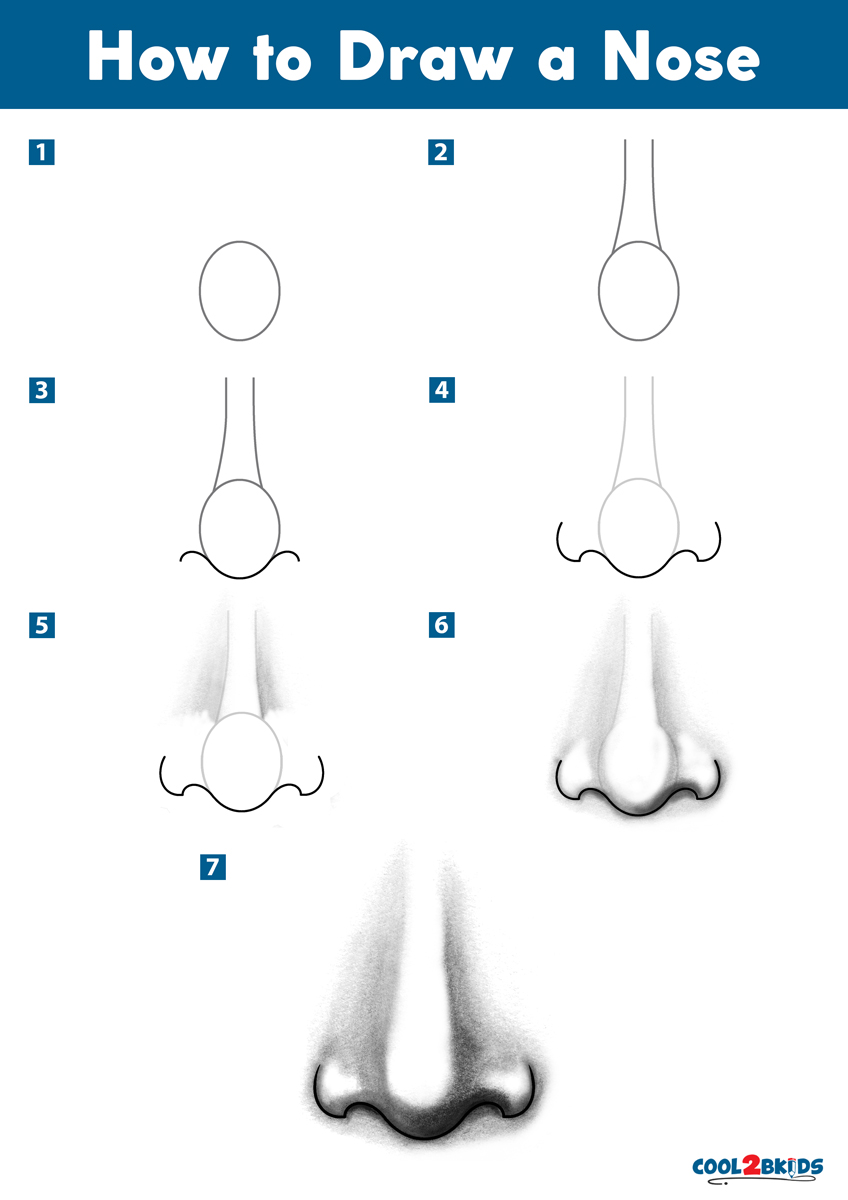
**Drawing facial features can often feel like navigating a complex maze, and among them, the nose frequently stands out as one of the most challenging. Its unique blend of soft curves, sharp angles, and intricate shading can intimidate even experienced artists. However, with the right approach and a clear understanding of its underlying structure, mastering nose drawing is not only achievable but also incredibly rewarding. This comprehensive guide will break down the process into manageable steps, helping you transform a daunting task into an enjoyable artistic journey.** We'll explore how to draw a nose from various perspectives—front, angle, and profile—and delve into the secrets of adding realism through shading and detail. Get ready to elevate your portrait skills and bring your characters to life with perfectly rendered noses! Learning how to draw a nose effectively is a cornerstone of realistic portraiture. It's a feature that, when accurately depicted, can convey character, emotion, and depth, making your overall artwork significantly more impactful. This article aims to demystify the process, providing you with the knowledge and techniques to confidently tackle this crucial element of the human face. So, grab your paper and pencil, and let’s get started on unlocking the secrets of impeccable nose drawing. *** ## Table of Contents * [The Foundation: Why Nose Drawing Matters](#the-foundation-why-nose-drawing-matters) * [Essential Tools for Your Nose Drawing Journey](#essential-tools-for-your-nose-drawing-journey) * [Deconstructing the Nose: Simplifying Complex Shapes](#deconstructing-the-nose-simplifying-complex-shapes) * [The Power of Basic Geometric Forms](#the-power-of-basic-geometric-forms) * [The Crucial Role of Angles](#the-crucial-role-of-angles) * [Mastering the Front View: A Step-by-Step Guide to Nose Drawing](#mastering-the-front-view-a-step-by-step-guide-to-nose-drawing) * [Drawing a Nose from an Angle: Adding Depth and Realism](#drawing-a-nose-from-an-angle-adding-depth-and-realism) * [Capturing the Nuances of Light and Shadow](#capturing-the-nuances-of-light-and-shadow) * [The Art of Profile: Drawing the Nose from the Side](#the-art-of-profile-drawing-the-nose-from-the-side) * [Expert Insights: Learning from Kelly Medford and Sycra Yasin](#expert-insights-learning-from-kelly-medford-and-sycra-yasin) * [Kelly Medford's Approach to Shading and Form](#kelly-medford's-approach-to-shading-and-form) * [Sycra Yasin's Comprehensive Video Course](#sycra-yasin's-comprehensive-video-course) * [Beyond the Basics: Refining Your Nose Drawing Skills](#beyond-the-basics-refining-your-nose-drawing-skills) *** ## The Foundation: Why Nose Drawing Matters Every face definitely needs a nose! While it might seem like a small detail in the grand scheme of a portrait, the nose plays a pivotal role in defining a person's character, age, and even ethnicity. A well-drawn nose adds three-dimensionality and realism to your artwork, preventing the face from appearing flat or generic. Conversely, an inaccurately drawn nose can throw off the entire facial balance, making your subject look unnatural or disproportionate. This is why dedicating time to master nose drawing is an investment in your overall artistic skill set. It's about more than just rendering a feature; it's about understanding the underlying anatomy and how light interacts with its complex form. The ability to confidently tackle this challenging facial feature will unlock new levels of precision and expressiveness in your portraits, whether you're working on realistic depictions or stylized characters. ## Essential Tools for Your Nose Drawing Journey Before we dive into the intricacies of nose drawing, let's ensure you have the right tools at hand. The beauty of drawing is its simplicity, and for a task like drawing a simple nose, you won't need much. All you will need is a pencil, a good eraser, and a sheet of paper. * **Pencils:** A range of graphite pencils is ideal. Start with an HB or 2H for initial light sketches and guidelines, as these are easy to erase. For darker lines, shading, and details, you'll want to use softer leads like 2B, 4B, or even 6B. The varying hardness allows for a wide spectrum of tones, which is crucial for realistic shading in nose drawing. * **Eraser:** A good quality kneaded eraser is invaluable. It can lift graphite without smudging and can be molded into fine points for precise corrections or highlights. A standard plastic eraser is also useful for broader clean-ups. * **Paper:** Any good quality drawing paper will do. Smooth paper is excellent for detailed work, while slightly textured paper can add character to your shading. * **Optional but Recommended:** * **Blending Stump or Tortillon:** These paper tools help you smoothly blend graphite, creating seamless transitions in your shading and eliminating harsh lines. * **Reference Photos:** High-quality reference photos of noses from various angles are essential for observation. This might be a nose that you draw from life, or one that you draw from a photo reference. Either way, the process of drawing will heavily depend on observation. Having these tools ready will set you up for success as you embark on your nose drawing adventure. ## Deconstructing the Nose: Simplifying Complex Shapes Drawing a nose can seem like a daunting task due to its odd shape and shading, but the key to making it easier is to take the structure and simplify it to its basic shapes. This principle is fundamental to drawing any complex object and is especially true for facial features. Instead of seeing a nose as one intimidating form, break the anatomy into smaller, more manageable shapes. ### The Power of Basic Geometric Forms To begin your nose sketch, we need to take the complex three-dimensional form of the nose and translate it into simpler, two-dimensional shapes on your paper. In order to make it easier, in this guide, I will show you how you can use your pencil to prepare some simple shapes that will then form the basic form of the nose. Think of the nose not as a single entity, but as a collection of geometric primitives: * **The Ball of the Nose:** This is often the most prominent part and can be simplified into a sphere or a rounded cube. This forms the central mass. * **The Bridge of the Nose:** This can be represented by a cylinder or a simple rectangular prism extending from the brow. * **The Nostrils and Wings:** These can be seen as smaller, softer forms attached to the main ball. Many artists simplify nostrils into parenthesis shapes or teardrops, and the wings as curved planes. * **The Septum:** The column of cartilage between the nostrils can be thought of as a small, rounded cylinder. By lightly drawing in these simple shapes first, you establish the overall proportion and placement of the nose on the face without getting bogged down in details too early. This initial simplification provides a robust framework upon which you can build realism. ### The Crucial Role of Angles Once you have your basic shapes, the next critical step in nose drawing is understanding and accurately capturing the angles. Lightly draw in these angles as straight lines first to avoid drawing a nose that is too rounded or too generic. The human nose, despite its curves, is full of subtle planes and angles that define its unique character and how light hits it. The most important angles to look for when drawing a particular nose are: * **The Angle of the Bridge:** Is it straight, curved, or slightly concave? * **The Angle of the Tip:** Does it point up, down, or straight out? * **The Three Angles that Make Up the Curve of the Ball of the Nose:** Even a seemingly round ball has subtle flat planes where light catches or shadows fall. Observe these planes carefully. * **The Angles of the Nostrils and Wings:** How do they connect to the ball of the nose? Are they flared, narrow, or asymmetrical? By observing and lightly sketching these angles as straight lines initially, you prevent your nose from looking like a featureless blob. These angles will guide your subsequent shading and detailing, ensuring your nose has a strong, believable structure. This foundational step is paramount for any realistic nose drawing. ## Mastering the Front View: A Step-by-Step Guide to Nose Drawing Drawing a nose from the front can be tricky, as it often appears flatter than from other angles. However, by breaking the anatomy into smaller shapes and following a structured approach, you can master how to draw noses step by step. This guide will show you how to start your nose sketch with 3 basic guidelines and then continue nose drawing step by step. Here’s a simplified approach, often achievable in just 9 simple steps, though the exact number can vary based on detail: 1. **Establish the Centerline and Base:** Start by drawing a vertical line down the center of where the nose will be. This acts as your central axis. Then, draw a horizontal line indicating the base of the nose, where the nostrils will sit. This is one of your basic guidelines. 2. **Define the Ball of the Nose:** About halfway down your vertical centerline, draw a circle or an oval. This will be the main mass of the nose's tip. This is your second basic guideline. 3. **Outline the Bridge:** From the top of your central line, lightly sketch two slightly converging lines downwards, connecting to the top sides of your circle. This forms the basic shape of the bridge. This is your third basic guideline. 4. **Place the Nostrils (Initial Parenthesis):** On either side of the bottom of your circle, draw two light, curved lines resembling parentheses `()` or soft 'C' shapes. These will be your initial guides for the nostrils and the wings of the nose. 5. **Refine the Nostrils and Septum:** Inside the parenthesis shapes, draw the actual nostril openings, which are often teardrop or kidney-bean shaped. Connect them at the bottom with a small, rounded line for the septum. 6. **Shape the Wings of the Nose:** Refine the outer edges of the parenthesis shapes to form the fleshy wings of the nose, ensuring they flow naturally from the ball of the nose. 7. **Develop the Bridge and Tip:** Gently refine the lines of the bridge, adding subtle curves. Use shading to create a gradual curve at the tip of the nose, making it appear round and dimensional. 8. **Begin Shading and Form:** This is where the magic happens. Identify your light source. Start with light shading to define the planes of the nose. Remember the angles you identified earlier. The sides of the bridge, the undersides of the nostrils, and the area where the nose meets the face will generally be darker. 9. **Add Details and Highlights:** Introduce finer details like the subtle creases around the nostrils or the slight indentation at the bridge. Add highlights on the most prominent areas, like the very tip of the nose or the bridge, to make it pop. Notice that each step in this drawing guide includes both an illustration (imagine this in a visual guide) and explanatory text. New lines in each step are shown in blue (conceptually), while previously drawn lines fade to black (conceptually). By following these simple steps, you too can easily draw a perfect nose from the front. ## Drawing a Nose from an Angle: Adding Depth and Realism Learning how to draw a nose from an angle introduces a new layer of complexity and realism to your nose drawing skills. For this part of our guide, you will learn how to draw a nose from an angle, which requires a deeper understanding of perspective and how forms recede in space. When a nose is viewed from an angle, its three-dimensionality becomes much more apparent, and capturing this depth is key to a convincing portrayal. The initial steps still involve simplifying the nose into basic shapes, but now these shapes will appear foreshortened or overlapped depending on the angle. For instance, the ball of the nose might appear as an ellipse rather than a perfect circle, and one nostril might be more visible than the other. 1. **Establish the Overall Angle:** Begin by lightly sketching a general wedge or block shape that represents the nose's overall tilt and projection from the face. This initial block helps you capture the correct perspective. 2. **Place the Ball of the Nose:** Draw an oval or sphere for the ball of the nose, keeping in mind its position relative to the bridge and how it projects forward. 3. **Connect to the Bridge:** Lightly sketch the bridge, making sure it connects naturally to the ball and recedes correctly into the face. 4. **Position the Nostrils and Wings:** This is crucial for angled views. The nostril on the side facing away from you will be less visible or even entirely hidden, while the closer nostril will be more prominent. The wings will also appear foreshortened. 5. **Refine Contours and Planes:** Once the basic structure is in place, begin to refine the contours. Pay close attention to how the planes of the nose turn away from or towards the viewer. This is where the angles you observed earlier become critical. Lightly draw in these angles as straight lines first to avoid drawing a nose that is too rounded or too generic. ### Capturing the Nuances of Light and Shadow We will explore how lighting and shadows work and how to draw a realistic nose at an angle. Shading is what truly brings an angled nose to life, giving it form and volume. Because the nose is a prominent feature, it casts distinct shadows and catches light in specific ways. * **Form Shadows:** These are the shadows that define the actual shape of the nose, appearing on the planes that turn away from the light source. The underside of the ball of the nose, the inside of the nostrils, and the side of the bridge furthest from the light will typically have form shadows. * **Cast Shadows:** The nose itself will cast a shadow onto the face below it. The shape and intensity of this cast shadow will tell the viewer a lot about the direction and strength of your light source. * **Highlights:** The areas of the nose directly hit by the light will be the brightest. This is often the bridge and the very tip of the nose. * **Reflected Light:** Even in shadowed areas, there might be subtle reflected light bouncing off the skin or surrounding features, which can soften the shadows and add realism. Due to its odd shape and shading, figuring out how to draw a realistic nose can prove challenging, but by breaking down the dos and don'ts of light and shadow, you can quickly master this aspect. Always observe your reference carefully to see how light behaves on the specific nose you are drawing. Use shading to create a gradual curve at the tip of the nose and to differentiate between the various planes. This attention to light and shadow is what transforms a simple line drawing into a three-dimensional form. ## The Art of Profile: Drawing the Nose from the Side Drawing the nose in profile is perhaps the most distinctive view, as it reveals the unique silhouette of a person's nose. From this perspective, the bridge, tip, and nostril all contribute to a very specific outline. Mastering this view is essential for complete facial portraits. 1. **Start with the Forehead and Brow:** Begin by lightly sketching the curve of the forehead and the brow bone, as the nose emerges directly from this area. 2. **Establish the Bridge:** From the brow, draw a line that defines the bridge of the nose. This line can be straight, concave (like a "button nose" which is small and round, with a slightly upturned tip), or convex (a Roman nose). This single line is incredibly important for character. 3. **Define the Tip:** As the bridge line descends, it transitions into the tip of the nose. This can be rounded, pointed, or upturned. Pay close attention to how it projects forward. 4. **Draw the Underside and Nostril:** From the tip, draw the line that forms the underside of the nose, connecting to the nostril. The nostril in profile is often a teardrop or comma shape. 5. **Connect to the Upper Lip:** Finally, draw the line from the base of the nostril down to the upper lip, defining the philtrum area. 6. **Add Subtle Shading:** Even in profile, shading adds dimension. The underside of the nose and the nostril will be darker, while the bridge and tip might catch highlights. Observation is paramount when drawing a nose in profile. Each person's profile is unique, and accurately capturing these subtle curves and angles is what makes a profile drawing compelling. ## Expert Insights: Learning from Kelly Medford and Sycra Yasin To truly excel in nose drawing, it's invaluable to learn from professional artists who have dedicated their careers to mastering these skills. We spoke with professional artist Kelly Medford to learn more about drawing and shading, and her insights, along with the teachings of Sycra Yasin, offer profound guidance. ### Kelly Medford's Approach to Shading and Form Kelly Medford, a renowned artist, emphasizes simplifying forms and understanding how light interacts with them. When it comes to nose drawing, she advocates for a methodical approach to shading that builds form gradually. She demonstrates coloring and blending the triangle to form the nose’s base, adding nostrils and wings with parenthesis shapes. This highlights the importance of: * **Building from Simple Forms:** As discussed, starting with basic shapes like triangles or spheres for the nose's base provides a solid foundation. * **Layering Shading:** Instead of applying dark tones immediately, Kelly suggests building up values in layers. This allows for greater control and creates smoother transitions, which are crucial for rendering the subtle curves of the nose. * **Understanding Planes:** Her method of "coloring and blending the triangle" implies treating the nose not as a single rounded object but as a series of interconnected planes. Each plane will catch light differently, and by shading these planes individually and then blending them, you achieve a three-dimensional effect. * **Using Parenthesis Shapes for Nostrils and Wings:** This specific tip is a fantastic shortcut for accurately placing and shaping these tricky elements. It provides a natural, organic feel to the nostrils, preventing them from looking stiff or artificial. Kelly's approach underscores that realistic nose drawing is less about drawing outlines and more about rendering light and shadow to create the illusion of form. ### Sycra Yasin's Comprehensive Video Course For those who prefer a dynamic, visual learning experience, Sycra Yasin offers an exceptional resource. Learn how to draw a nose and improve your art skills with this fun video course from Sycra Yasin which shows you how to draw noses from any angle easily. Sycra is celebrated for his clear, concise, and highly effective teaching methods, breaking down complex anatomical concepts into digestible lessons. His video course likely covers: * **Drawing Noses from Any Angle:** This is a significant advantage, as it provides a holistic understanding of the nose's structure in 3D space, enabling you to confidently draw it from front, side, three-quarter, or any other view. * **Simplification Techniques:** Sycra, like many great instructors, would emphasize simplifying the nose into basic forms before adding detail, making the process less intimidating. * **Anatomical Understanding:** A good course will delve into the underlying bone and cartilage structure of the nose, which informs its surface appearance. * **Practical Exercises:** Video courses often include exercises that allow you to apply what you've learned immediately, reinforcing the concepts. If you're looking for a structured, comprehensive learning path, exploring Sycra Yasin's course, such as his "Character Drawing Essentials" (which might be open for a limited time, offering a discount), could be a game-changer for your nose drawing and overall portrait skills. The process of drawing will heavily depend on observation, and these experts provide the frameworks to make that observation effective. ## Beyond the Basics: Refining Your Nose Drawing Skills Once you've grasped the fundamental principles of nose drawing—simplifying shapes, understanding angles, and applying basic shading—you can begin to refine your skills and add even greater realism and character to your work. Then, you can take what you learn to draw different noses and perhaps even full facial portraits! * **Observation is Key:** Continuously practice drawing noses from life, from photos, and from different individuals. Notice the infinite variety in nose shapes: long, short, wide, narrow, upturned, hooked, button noses, etc. Each nose tells a story. The more you observe, the better you'll become at capturing these unique characteristics. * **Subtle Details:** Once the main form is established, add details like the slight indentation at the bridge, the subtle curves of the alar cartilages (the wings), and the texture of the skin. Don't overdo it; sometimes less is more. * **Edge Control:** Pay attention to the edges of your forms. Not all edges are sharp; some are soft and blended, especially where the nose transitions into the cheek. Varying your line weight and blending techniques will make your nose drawing much more realistic. * **Context within the Face:** Remember that the nose doesn't exist in isolation. It interacts with the eyes, eyebrows, mouth, and cheeks. Ensure its proportions and placement are harmonious with the rest of the face. Practice drawing full facial portraits to see how the nose fits into the overall composition. * **Experiment with Lighting:** Challenge yourself to draw the same nose under different lighting conditions. How does a strong overhead light change the shadows compared to a soft, diffused light? Understanding this will deepen your comprehension of form and volume. * **Don't Be Afraid to Erase:** Drawing is an iterative process. Don't be afraid to make mistakes and erase. A good eraser is your best friend in refining your work. Drawing facial features can be tricky, but by consistently applying these principles and practicing diligently, you'll find that nose drawing, once a daunting task, becomes one of your strengths. *** **In conclusion, mastering nose drawing is a journey of simplification, observation, and meticulous practice.** We've covered how to draw a nose from the front, at an angle, and in profile, emphasizing the importance of breaking down complex anatomy into basic shapes and understanding the crucial role of angles, light, and shadow. From the initial three basic guidelines to adding intricate details like nostrils, the bridge, and the septum, each step contributes to a realistic and compelling depiction. Learning from experts like Kelly Medford and Sycra Yasin further illuminates the path, offering invaluable techniques for shading, form, and drawing from any angle. The ability to draw a great looking nose with easy drawing instructions and video tutorial guidance (like Sycra's) truly empowers you to improve your art skills. Remember, whether you're sketching a simple nose or embarking on a full facial portrait, the process heavily depends on keen observation and a willingness to build forms step by step. Now that you're equipped with this comprehensive guide, it's time to put pencil to paper! What challenges have you faced in nose drawing, or what aspects are you most excited to try? Share your thoughts and progress in the comments below. If you found this article helpful, please consider sharing it with fellow artists, and don't forget to join our newsletter for more drawing tips and perhaps even a free welcome gift like a coloring PDF to continue your artistic journey!
Address : 434 Aufderhar Bypass
East Anabelle, MT 52001
Phone : 913-461-0826
Company : Nicolas, Kovacek and Beatty
Job : Extruding and Drawing Machine Operator
Bio : Et molestiae eveniet neque architecto. Repellat quasi perspiciatis reiciendis alias itaque. Optio dicta molestias itaque sunt eum. Qui quo est doloremque modi.
bio : Corporis voluptas sunt possimus voluptatem. Minus voluptate dignissimos aut laborum. Tempora tempora eveniet dolores nulla qui commodi occaecati sunt.