Mastering Spongebob Drawing: Your Ultimate Guide To Bikini Bottom Art
Table of Contents
- Why Spongebob is the Perfect Character for Aspiring Artists
- Essential Art Supplies for Your Spongebob Drawing Journey
- Preparing Your Canvas: Setting Up for Success
- The Core Structure: From Simple Shapes to Spongebob's Form
- Bringing His Face to Life: Capturing Spongebob's Iconic Expressions
- Dressing Spongebob: His Signature Outfit and Accessories
- Advanced Tips for Your Spongebob Drawing: Beyond the Basics
- Learning Resources: Where to Find More Spongebob Drawing Fun
- Conclusion
Why Spongebob is the Perfect Character for Aspiring Artists
Spongebob Squarepants isn't just a beloved cartoon character; he's also an incredibly rewarding subject for artists of all ages and skill levels. One of the main reasons for this is that Spongebob is an easy character to draw because you can break him down into simple shapes. This foundational approach makes the entire process less intimidating and more enjoyable, especially for beginners. Unlike characters with complex anatomies or intricate details, Spongebob’s core design relies on basic geometric forms, making him an excellent starting point for anyone looking to hone their drawing skills. Furthermore, Spongebob is a versatile and recognizable character that can be used to communicate a wide range of messages. His expressive face and distinct uniform allow for endless creative interpretations. Whether you're drawing him happy, surprised, or even a little grumpy, his emotions are always clear and engaging. This versatility means that once you master the basics of Spongebob drawing, you can experiment with different poses, expressions, and even scenarios, adding your unique flair to each piece. It's a fantastic way to build confidence and explore your artistic voice, making the journey of learning how to draw Spongebob Squarepants a truly delightful adventure.Essential Art Supplies for Your Spongebob Drawing Journey
Before we dive into the actual drawing process, let's talk about the tools you'll need. The good news is, you don't require an expensive art studio to get started with Spongebob drawing. The beauty of learning how to draw Spongebob Squarepants lies in its accessibility. This is a list of the supplies we used, but feel free to use whatever you have in your home or classroom. The most important thing is to have something to draw with and something to draw on! Here’s a simple list to get you started: * **Pencil:** A standard graphite pencil is perfect for sketching out your initial shapes. Its erasable nature allows you to make mistakes and refine your lines without fear. Look for a pencil that's not too hard (like an HB or 2B) so it doesn't leave deep indentations on your paper. * **Eraser:** An absolute must-have! A good quality eraser will help you clean up your sketch lines and remove any unwanted marks, leaving your final drawing crisp and clean. * **Paper:** Any paper will do! We often use marker paper for its smooth surface and ability to handle various mediums, but standard printer paper, sketchbook paper, or even a notebook will work just fine. The size doesn't matter as much as having a clean surface to work on. * **Sharpie (or something to draw with for outlines):** Once your sketch is perfect, you'll want to go over your lines to make them bold and permanent. A fine-point Sharpie is excellent for this, providing a consistent, dark line. If you don't have a Sharpie, a black pen, a thin marker, or even a darker pencil will suffice. The goal is to make your Spongebob drawing stand out! * **Coloring Tools (Optional but Recommended):** To truly bring your Spongebob to life, you'll want to add color. Crayons, colored pencils, markers, or even watercolors can be used. Think about Spongebob's iconic yellow body, white shirt, red tie, and brown pants – these colors will make your drawing instantly recognizable. Remember, the goal is to have fun and be creative. Don't let a lack of "professional" supplies deter you. The best art comes from passion and practice, not necessarily the most expensive tools.Preparing Your Canvas: Setting Up for Success
Before you even make your first mark, a little preparation can go a long way in making your Spongebob drawing experience smooth and enjoyable. Think of your paper as your canvas, and setting it up correctly is the first step to a successful drawing. First, consider the orientation of your paper. While Spongebob is typically a vertical character, a portrait (vertical) or landscape (horizontal) orientation can work depending on whether you plan to add a background or other characters. For a simple Spongebob, portrait is usually best. Next, find the center of your page. This is where your main Spongebob shape will begin. Near the middle of the page, draw a large square but make the lines a bit wavy! This initial square will serve as the foundational outline for Spongebob's body. Don't press too hard with your pencil at this stage; these are just guide lines that you'll erase later. The wavy lines are crucial for capturing Spongebob's sponge-like texture right from the start. This simple step ensures that your Spongebob drawing is well-proportioned and centered on your page, giving you plenty of space to add his goofy details and accessories. Taking these few moments to prepare your canvas sets the stage for a confident and successful drawing session.The Core Structure: From Simple Shapes to Spongebob's Form
Now that your paper is ready, it's time to lay down the basic structure of our beloved character. Spongebob is, of course, a sponge, and his name, "Squarepants," gives us a big clue about his primary shape. However, while he has "square" in his name, Spongebob is more of a 3D rectangle shape in his overall form. Understanding this subtle distinction is key to making your Spongebob drawing look authentic and dynamic. We'll start with the largest, most fundamental shapes and gradually add details. This simple lesson consists of nine steps, and we're already on our way! Remember, the initial lines should be light and loose. Don't worry about perfection; focus on getting the general proportions right. The core of Spongebob's body is essentially a slightly tapered rectangle. Imagine a tall, somewhat narrow box. This will be the main volume that everything else attaches to. Think about how his top is slightly wider than his bottom, giving him that characteristic, slightly awkward, yet endearing silhouette. With the help of this lesson, you will be able to learn how easy it is to draw a Spongebob. We are glad to offer you this exciting and funny drawing lesson in which you will learn how to draw a Spongebob step by step.Step-by-Step Guide: Building Spongebob's Body
1. **The Wavy Rectangle:** Begin by lightly sketching that large, wavy rectangle in the center of your page. Make sure it's tall enough to accommodate his legs and head later. This is the foundation of your Spongebob drawing. 2. **Rounded Corners:** Although he's "Squarepants," Spongebob's corners aren't perfectly sharp. Lightly round off the corners of your rectangle to give him a softer, more organic sponge-like appearance. 3. **The Bottom Edge:** Spongebob's bottom edge isn't perfectly flat; it has a slight curve, almost like he's standing on a soft surface. Add a subtle upward curve to the bottom line of your rectangle. 4. **Defining the Sides:** Refine the side lines of your rectangle, making them slightly irregular and wavy to emphasize his sponge texture. Think of him as a natural, slightly imperfect sponge, not a perfectly cut block. 5. **Establishing the Waistline:** About two-thirds of the way down from the top of your rectangle, draw a light horizontal line. This will be where his pants begin, helping you proportion his upper body and lower body correctly. This is a crucial step in ensuring your Spongebob drawing looks balanced. By following these initial steps, you've already established the core structure of Spongebob's body. You'll see how easy it is to build upon these simple shapes to create a recognizable character.Bringing His Face to Life: Capturing Spongebob's Iconic Expressions
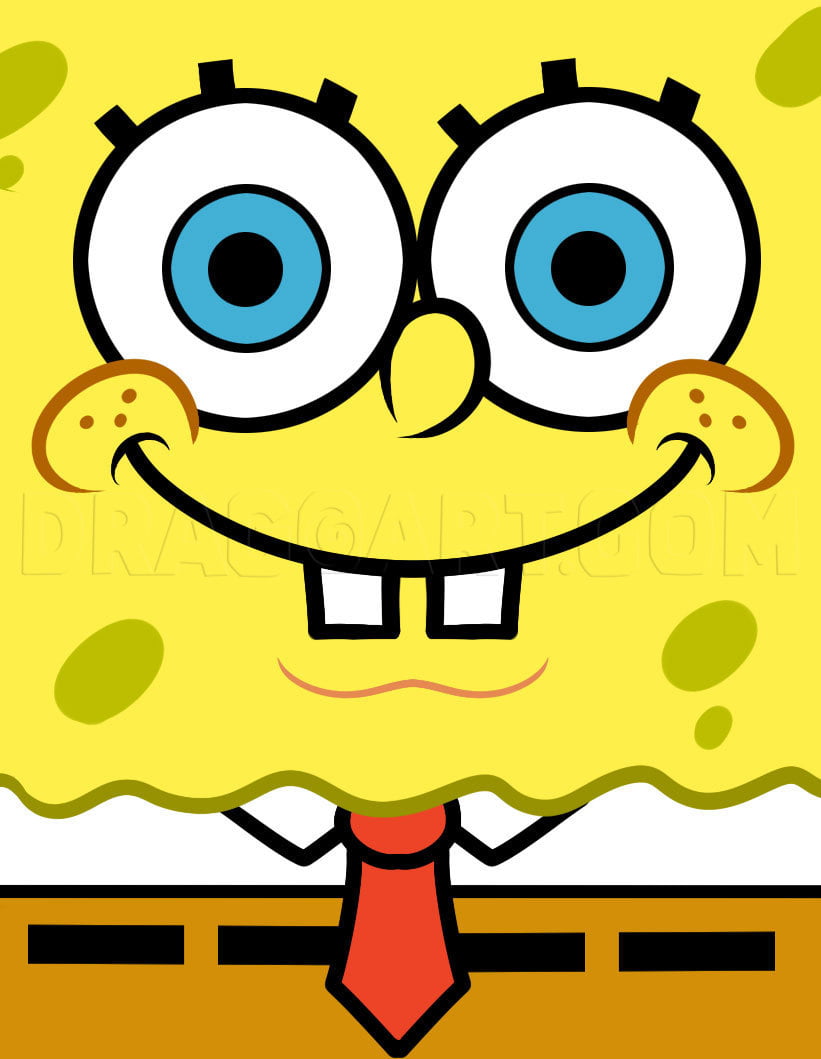
Once you have the body shape down, the next crucial step in your Spongebob drawing journey is to bring his face to life. Spongebob's face is arguably his most expressive feature, capable of conveying a wide range of emotions, from pure joy to bewildered confusion. Capturing these goofy details is what makes a Spongebob drawing truly pop. His face occupies the upper portion of his body, specifically the top third of the wavy rectangle you've drawn. Think of it as a separate, smaller canvas within the larger one. The key to his expressiveness lies in the placement and exaggeration of his eyes, nose, and mouth. We'll focus on getting the basic proportions right first, and then we'll add the specific details that make him uniquely Spongebob. Remember, even though he's a cartoon, paying attention to the relative sizes and positions of his features will make your drawing more accurate and appealing.Detailing Spongebob's Features: Eyes, Nose, and Smile
Let's break down the process of creating Spongebob's memorable face: 1. **The Eyes:** Spongebob's eyes are large and round, positioned relatively high on his face and close together. Draw two big circles for his eyes, making sure they are roughly the same size. These circles should be slightly above the halfway point of his face. Inside each circle, draw a smaller circle for the iris and then an even smaller dot for the pupil. Don't forget the three eyelashes on each eye – these are small but important details that contribute to his overall look. 2. **The Nose:** Spongebob has a long, somewhat slender nose that protrudes from the center of his face, just below and between his eyes. It's not perfectly straight; give it a slight curve or bend, adding to his whimsical appearance. 3. **The Cheeks and Freckles:** Below his eyes and to either side of his nose, Spongebob has prominent, round cheeks. These are often depicted with three small freckles on each cheek, arranged in a triangular pattern. These details add a touch of youthful charm to your Spongebob drawing. 4. **The Mouth:** Spongebob's mouth is wide and expressive. It usually stretches across the lower part of his face, often showing his two large buck teeth. When drawing his mouth, consider the emotion you want to convey. A wide, upward curve for a happy Spongebob, or a more neutral line for a thoughtful one. Don't forget his tongue and the distinct line that separates his two front teeth. 5. **The Dimples:** When Spongebob smiles widely, he often has two small, circular dimples on either side of his mouth. These are subtle but add depth to his expressions. The face is complete! With these details, your Spongebob drawing is already starting to take on his characteristic personality. The key is to pay attention to these small elements, as they collectively contribute to his iconic look.Dressing Spongebob: His Signature Outfit and Accessories
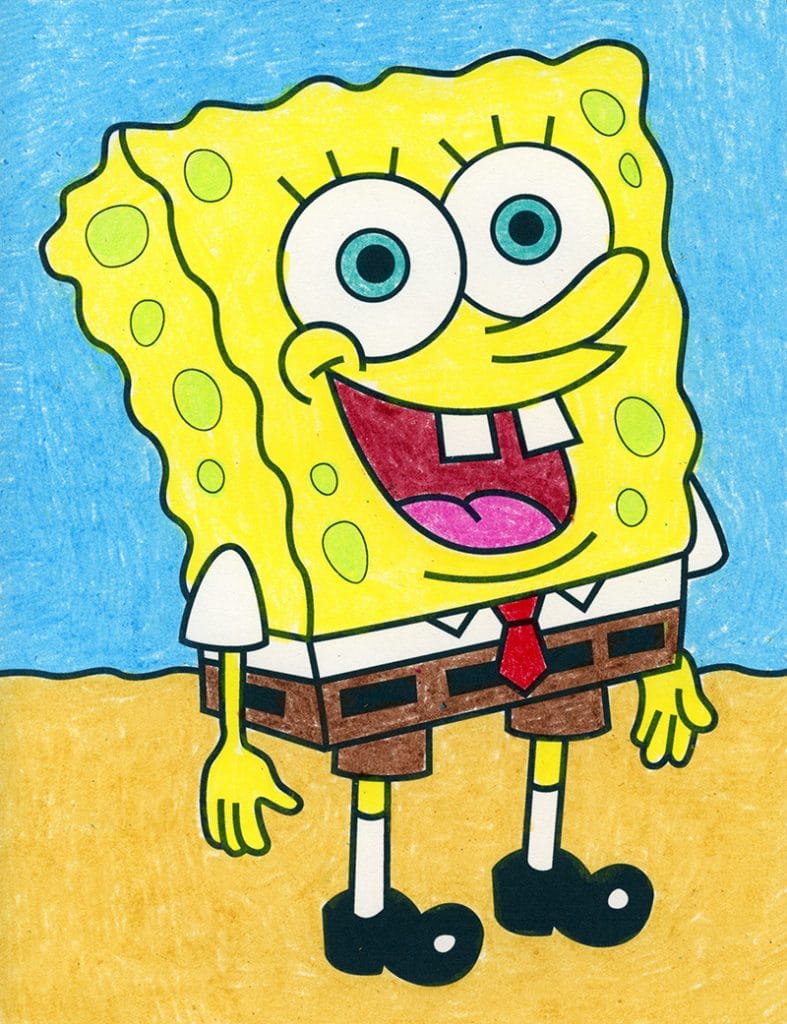
Now that Spongebob's body and face are taking shape, it's time to dress him in his instantly recognizable attire. His outfit is as iconic as his yellow, porous body, and adding these details will truly complete your Spongebob drawing. From his crisp white shirt to his smart red tie and brown square pants, each element contributes to his unique identity. We'll start with the larger pieces of clothing and then move on to the smaller accessories that give him his distinct look. Remember to keep your lines clean and purposeful, as these details define his character.Adding the Finishing Touches: Arms, Legs, and Bubbles
Let's meticulously add Spongebob's signature ensemble: 1. **The White Shirt:** Spongebob's shirt is relatively simple. It covers the upper portion of his body, just above his pants. Draw a straight line across his body for the bottom edge of his shirt, and then add the collar of his shirt. The collar should be a crisp, pointed shape that frames his neck. 2. **The Red Tie:** Directly below his collar, draw his small, red tie. It's a simple, triangular shape that hangs neatly. This splash of red is a key identifying feature. 3. **The Brown Pants and Belt:** First, use some straight lines for the outlines of his pants. His "Squarepants" are indeed square and brown. They begin at the waistline you established earlier and extend down to just above where his legs will start. Add his belt details: a simple black belt with a golden buckle. This belt helps define the separation between his shirt and pants. 4. **The Arms:** Spongebob's arms are thin and flexible. They extend from the sides of his upper body. Draw them as two slightly curved lines, ending in four-fingered hands. His hands are often depicted with a slight curve, as if he's ready to gesture or grab something. Don't forget his distinct, round holes on his arms and hands, reflecting his sponge nature. 5. **The Legs:** His legs are also thin, extending from the bottom of his pants. Draw them as two straight lines, leading down to his shoes. 6. **The Shoes:** Spongebob wears black, somewhat clunky shoes. Draw two rounded shapes at the bottom of his legs. They should look sturdy and slightly oversized, fitting his cartoonish style. 7. **The Socks:** Don't forget his white socks! These are visible between his pants and his shoes, typically with a red and blue stripe pattern at the top. This detail adds a touch of color and completes his iconic look. 8. **Sponge Holes:** Finally, add the signature holes all over Spongebob's body. These are irregular, circular, or oval shapes scattered across his yellow form, emphasizing that he is, in fact, a sponge. These details truly bring your Spongebob drawing to life. With these steps, your Spongebob drawing is almost complete! You've captured all his goofy details, from his wavy body to his precise attire.Advanced Tips for Your Spongebob Drawing: Beyond the Basics
You've mastered the fundamentals of Spongebob drawing, from his basic shape to his iconic outfit. Now, let's explore some advanced tips and creative ideas to take your art to the next level. Spongebob drawing ideas are best to inspire artists of all ages and skill levels to create their unique masterpieces. This is where you can truly make your drawing your own, adding depth, personality, and even a bit of the Bikini Bottom environment. Consider adding texture and dimension to your Spongebob. While his body is primarily flat in the cartoon, you can use subtle shading to give him a more three-dimensional look. Think about where light might hit him and where shadows might fall, especially around his eyes, nose, and the edges of his body. The sponge holes can also be given depth by shading one side of each hole. Experiment with different poses and expressions. Spongebob is known for his incredibly dynamic and often exaggerated emotions. Try drawing him laughing hysterically, looking confused, or even playing his clarinet. Each expression will challenge you to manipulate his facial features in new ways, enhancing your understanding of character design.Exploring Spongebob Drawing Variations and Coloring
1. **Adding Movement:** Spongebob is rarely still. Try drawing him in motion – running, jumping, or even doing the "Worm." This involves understanding how his limbs bend and how his body might squash or stretch with movement. 2. **Including Friends:** The world of Spongebob Squarepants is rich with memorable characters. Continuing with this Spongebob characters drawing, you can finish drawing Spongebob while adding some more details for Squidward, Patrick, Sandy, or even Mr. Krabs. Drawing multiple characters in one scene can create a narrative and add complexity to your artwork. From the iconic Spongebob himself to his quirky friends and other unique characters, you'll surely fall in love with these characters to draw. 3. **Backgrounds:** Place Spongebob in his natural habitat. Draw his pineapple house, the Krusty Krab, or even just some coral and seaweed. A background adds context and makes your drawing a complete scene. 4. **Coloring Techniques:** Don't just fill in colors flatly. Experiment with gradients, blending, and layering colors to give your Spongebob drawing more vibrancy. For example, use a slightly darker yellow for shaded areas of his body. 5. **Digital Drawing:** If you're comfortable with traditional art, consider trying digital Spongebob drawing. Software like Procreate, Photoshop, or even free programs like Krita offer tools for layers, brushes, and effects that can open up new creative possibilities. 6. **Coloring Pages:** If you're looking for a fun, low-pressure way to practice your coloring skills or just want to relax, there are plenty of resources available. For instance, you can find + de 100 desenhos do Bob Esponja para colorir grátis (over 100 free Spongebob coloring pages). On many websites, you'll find mais de 6.500 desenhos para colorir em tamanho grande, ideal para impressão! (over 6,500 large coloring pages, ideal for printing!). These are fantastic for experimenting with color palettes and shading without the pressure of drawing the lines yourself. By pushing beyond the basic Spongebob drawing, you'll not only improve your technical skills but also develop a deeper appreciation for character art and storytelling through visuals.Learning Resources: Where to Find More Spongebob Drawing Fun
Our goal with this guide was to make Spongebob drawing as easy and enjoyable as possible, recognizing that sometimes, previous Spongebob drawing tutorials were too hard for some. That's why we decided to try to make an easier Spongebob tutorial, breaking it down into manageable steps. But the learning doesn't have to stop here! The world of Spongebob drawing is vast and full of resources to help you continue your artistic journey. Here are some excellent avenues to explore for more art lessons and inspiration: * **Video Tutorials:** For visual learners, watching someone draw Spongebob step-by-step can be incredibly helpful. Many artists create detailed video guides. Look for tutorials that offer clear instructions and show the process from start to finish. You can often find videos that encourage you to "Watch the video, download the coloring page and join the daily draw for more art lessons." These interactive experiences are fantastic for reinforcing what you've learned. * **Official Websites and Resources:** For the most accurate character details and inspiration, always check out official sources. You can also visit the official Spongebob Squarepants website here, which often features character guides, games, and sometimes even drawing challenges or printable activities. These sites are a treasure trove for fans and artists alike. * **Online Drawing Communities:** Platforms like DeviantArt, Instagram, and Pinterest are filled with fan art and tutorials. Search for "How to draw Spongebob from Spongebob Squarepants" or "Spongebob drawing tutorials for kids and adults" to find a plethora of examples and guides. Seeing how other artists interpret Spongebob can spark new ideas for your own drawings. * **Art Books and Guides:** Many publishers offer "learn to draw" books specifically for popular cartoon characters. These can provide structured lessons and tips that go beyond what a single online tutorial might cover. * **"Daily Draw" Challenges:** Some art communities or websites host "daily draw" challenges where you're encouraged to draw a specific character or theme each day. Participating in these can help you practice consistently and build your skills rapidly. "Follow along with us and learn how to draw Spongebob Squarepants" is a common invitation from such communities. * **Subscribe to Art Channels:** If you find an artist or channel whose teaching style you enjoy, "Learn to draw Spongebob Squarepants subscribe" to their content. This ensures you'll receive updates on new tutorials and tips directly. Remember, practice is key! The more you draw, the better you'll become. Don't be afraid to experiment, make mistakes, and most importantly, have fun with your Spongebob drawing adventures.Conclusion
You've embarked on an exciting artistic- Where Can I Watch One Tree Hill
- Fraunces Tavern
- Biden At Pope Funeral
- Aflac Duck
- La Doble Vida De Mi Esposo Multimillonario

How to Draw Spongebob Squarepants - Really Easy Drawing Tutorial
Draw SpongeBob SquarePants Tutorial and SpongeBob Coloring Page
How To Draw Spongebob Easy Tutorial, 6 Steps - Toons Mag
